
batjaket / stock.adobe.com
From the infrequently updated business site to the bustling e-commerce marketplace, websites of all shapes and sizes require a reliable WordPress backup solution. That’s why we’ll be delving into how to automate a WordPress backup to S3 today.
Unfortunately, backups aren’t always something people think about when they’re first developing a website. They’re so concerned with getting the design and content right, as well as launching by a certain date, that implementation of a WordPress backup solution doesn’t always factor into the planning.

Whether you enter the picture during the WordPress development phase or down the road as your client’s trusted maintenance provider, you must make backups a priority, alongside site security and speed.
In this guide, we’re going to look at the five very straightforward steps you need to take to set up a WordPress backup to S3 (Amazon’s free storage service).
- Step 1: Decide What You Need to Do with the WordPress Backup
- Step 2: Choose and Install a WordPress Backup Plugin
- Step 3: Sign Up for Amazon S3 Storage
- Step 4: Connect the WordPress Backup to S3
- Step 5: Use the Plugin to Save and Restore Backups
Let’s start by figuring out what sort of WordPress backup strategy makes the most sense for your client’s website.
Step 1: Decide What You Want to Do with the WordPress Backup
Storing a WordPress backup to S3 on another off-server can be incredible in times of duress. Think about the following scenarios:
Your client’s website has been defaced. As a result, it’s going to take you hours to comb through every inch of the website and database to uncover the defacement. You then have to clean it up.
A plugin update was waiting in WordPress when you logged in. However, upon implementing it, something malfunctioned and the white screen of death appeared. You asked one of your contractors to go into the control panel to delete the offending plugin from the wp-content folder. However, they deleted the wp-content folder altogether.
You just received word from a client that there’s something wrong with their website. Upon review, you’ve discovered that the problem stems from a critical server error and all the data from your client’s site has been lost.
In all these cases, regular backups would’ve given you and your clients peace of mind in knowing there was a quick and easy way to restore the website to its proper form.
But it’s not enough to just plan on saving backups. This requires a little more thought and care if you want your backups to be there to recover your client’s site from any and all harm. Here is what you need to consider as you plan your WordPress backup strategy:
Question: Which WordPress Backup Solution Will You Use?
You have three options here, though only two of them are viable considering what we’re talking about it.
- Web Host: Most web hosts will offer free backups with hosting plans. That said, leaving something that critical in the hands of a host (if they’re not a managed WordPress provider, that is) isn’t a smart choice. If something happens at the server level, all that data will be lost. Who will be there to back up your backup?
- WordPress Backup Plugin: There are a good many WordPress backup and restore plugins that enable users to handle the backup process from within WordPress. Your goal, however, should be to have a copy of your backup stored off-server. This is why you need to use options that allow you to create a WordPress backup to S3 and other external storage services.
- Third-Party Provider: WordPress maintenance companies will take care of managing backups on your behalf. And they’ll store them safely away from harm’s reach if anything were to happen in WordPress or on your server.
Question: Do You Want to Automate Backups or Manually Handle Them?
Assuming you don’t outsource backups to a third-party provider, you should decide how much time you intend to dedicate to them.
Most plugins enable users to automate the process of storing backups, but some may limit how frequently you schedule them or how much of your website can be saved in each. As such, you could end up having to save your own backups anyway, especially prior to implementing WordPress updates.
[bctt tweet=”???? If you don’t want restrictions to get in your way of securely backing up your WordPress site, and you don’t want to be bothered with the manual labor of managing them, carefully review your plugin choices and choose one that will allow you to work the way you want to. #WordPress” username=”thewpbuffs”]
Question: How Frequently Do You Need to Save Backups?
This depends on how much content you have and how often you create or change it. Websites with active blogs should create a backup schedule that aligns with publication (most likely daily). The same goes for e-commerce stores and other websites that frequently refresh their content and add new inventory on a regular basis.
For everyone else, a weekly or monthly backup schedule should suffice. Though, do remember to save a WordPress backup to S3 (or your preferred external storage service) before any updates are made. You never know when one of them may wreak havoc on your server.
Question: What Do You Need to Backup?
Backups don’t always have to be full snapshots of your WordPress site. Many backup solutions allow you to back up certain files or parts of the database.
Files comprise the structure of your site, including the core, plugins, themes, and code. The database includes the content displayed to users.
Being able to cherry-pick what to save can come in handy if you know that only a certain part of the site has to be restored. It’s also good for conserving storage space on your external storage service.
Question: Where Should You Store the Backups?
While it is definitely convenient to have a web host store backups on the server, you must have other backups in place if you want to prevent the possibility of loss. By storing your website’s files and database externally, you’ll keep your site’s copies far out of reach of danger.
As for where you store them, most WordPress automatic backup solutions will give you a variety of options to choose from. Here are some of the more common ones:
- Zipped file to email
- FTP
- Dropbox
- Google Drive
- Rackspace Cloud
- Microsoft Azure
- SugarSync
- Amazon S3
Amazon S3, of course, is the one I’m recommending today. Why? Well, for starters, it’s free to get started. Oh, and because it’s powered by Amazon and its technology partners. Your cloud backups will be stored on durable, secure, and always-available servers. Scalability won’t be a problem either, which is nice if you have plans to significantly grow the size of your website.
Now that you’ve sorted out the pertinent details regarding how you will use backups, let’s dig into the process of creating and using them.
Step 2: Choose and Install a WordPress Backup Solution
If you’ve decided that a WordPress backup plugin is the right option for you, you now have to find the right one for your purposes. You can use this guide to narrow down the selection process.
As a recap:
There are a couple of freemium backup plugins that allow you to configure a WordPress backup to S3 at no charge.
BackWPUp and UpdraftPlus are similar services. Use them to automate and schedule backups, and send copies to your preferred storage provider of choice. Upgrades to premium will, of course, give you more storage options as well as a greater degree of control over how backups are captured.
One other free plugin we’d recommend is Duplicator. Although it’s not a traditional backup-and-restore plugin, it does a lot of what the others do. It’s just more narrow in focus. Specifically, Duplicator enables users to save full copies of their websites for the purposes of migration or duplication. But full copies of WordPress sites work just as well for backups, too.
There are also a number of strictly premium backup plugins you could choose from as well.
BackupBuddy from iThemes, BlogVault, and VaultPress from Automattic are our top picks. Any of these plugins would do you well if you’re looking for full control over how, where, and when backups are saved for your site. Plus, you can easily connect your WordPress backup to S3 with these plugins.
For the purposes of the following tutorial, I’m going to use UpdraftPlus as it’s the most downloaded and well-rated of the free plugin options. The configuration will be similar regardless of which plugin you use, so feel free to follow along and replicate the process with your own plugin.
1. Install the Plugin
From WordPress, locate the free UpdraftPlus from Plugins > Add New.

Click “Install Now” and then “Activate” to add it to your WordPress site.
2. Configure the Plugin’s Settings
You’ll find your new backup plugin under the Settings tab on your WordPress sidebar.
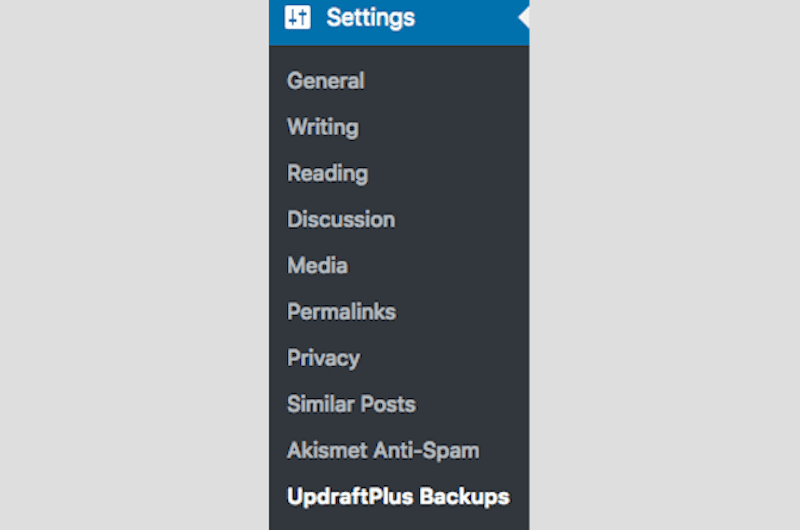
Settings
You’ll find five tabs within this Settings module. For configuring a WordPress backup to S3 or another external storage service, click on “Settings”.
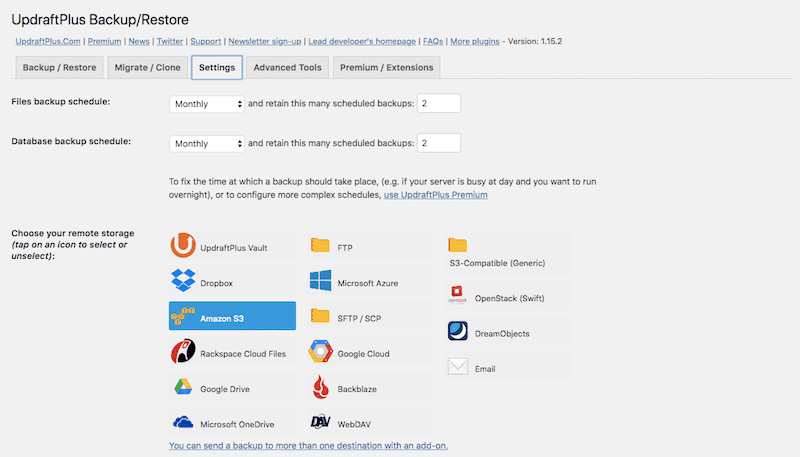
The first thing this page will ask you to do is decide the “when”, the “what”, and the “how many” of your backups:
- When: You can choose to capture backups from every four hours to once a month. Or you can elect to handle them manually.
- What: You have to set a schedule and quantity for both the website’s files and database. If you don’t need the whole site saved every time, adjust the frequency accordingly.
- How Many: There’s no need to save every backup of your website from the time of inception onward. But do set a reasonable limit that allows for plenty of coverage.
Before you select a storage destination, scroll down and finish populating the basic settings of your UpdraftPlus plugin.
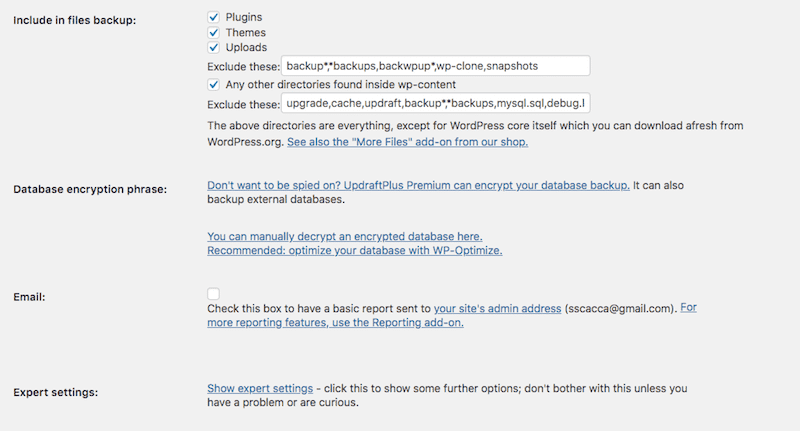
Here you can choose which files are saved in the backup. You can also configure expert and premium settings if you so choose.
Advanced Tools
There are other settings you may be interested in under “Advanced Tools”. One such feature is UpdraftCentral, a WordPress management tool from UpdraftPlus.
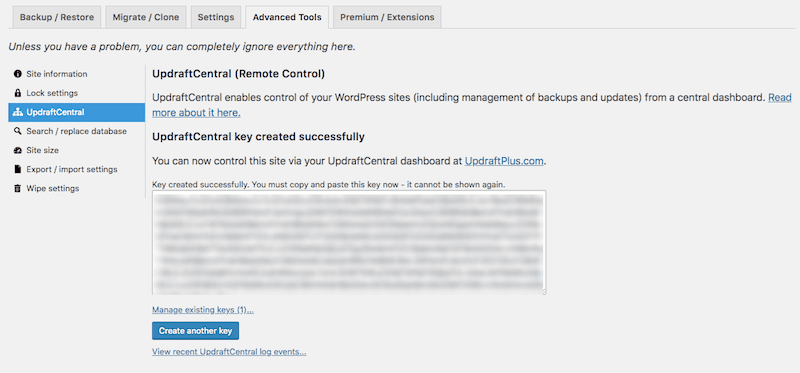
This is especially helpful if you manage backups for multiple clients with UpdraftPlus. Once you’ve retrieved your unique key for the site and you’ve created an UpdraftCentral account, you can manage the backups for all your sites in one place.
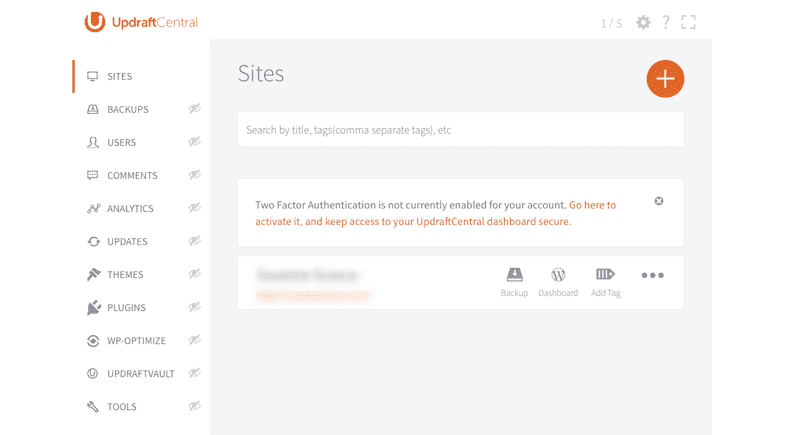
Even if you only have the one website to manage, this feature is especially helpful if you should lose access to your site and want to restore the backup remotely from UpdraftPlus.
Settings – Amazon S3
Once you’re satisfied with the configuration of the plugin, return to the Settings tab so we can connect Amazon S3.
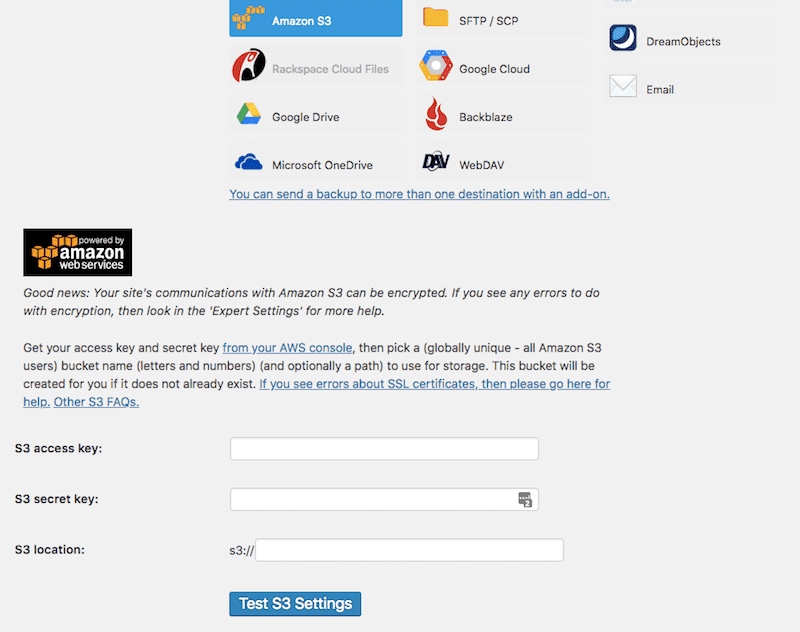
From the list of remote storage providers, choose Amazon S3.
In order to save a WordPress backup to S3, you have to insert your personal keys and location information. So, let’s hop over to Amazon for a few minutes before we complete the setup of this backup plugin.
Step 3: Sign Up for Amazon S3 Storage
To sign up for a free account with Amazon S3 storage, go to the website.

If you don’t yet have an AWS account, create a new one.
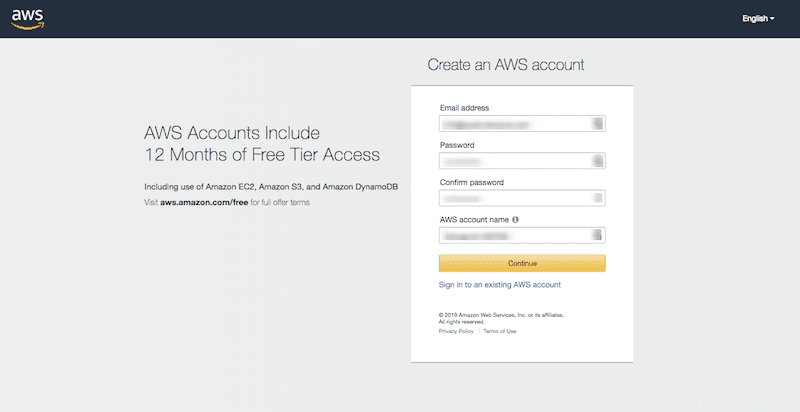
Signup will require a few details about your business along with a credit card.
While Amazon S3 is free to use for a year, it does have its limits (as do most external storage services). If you exceed the maximum storage on S3’s free tier, you’ll be charged, so Amazon needs to have a payment method on file.
Just be mindful of this as you configure your client’s backup settings. If you know that the quantity and size of the backups they need stored will exceed the free plan, be sure to discuss with your client so they’re aware that an invoice is coming their way.
Once you’ve completed signup, you’ll be taken to the AWS dashboard.

As you can see, there is a lot you can do with Amazon Web Services. Click on the “Services” tab in the top navigation to drop open your choices. Locate “S3” under “Storage”.

Inside the S3 dashboard, you’ll be asked to create your first “bucket”. If you scroll down just a tad bit, you’ll find high-level instructions of how this works:
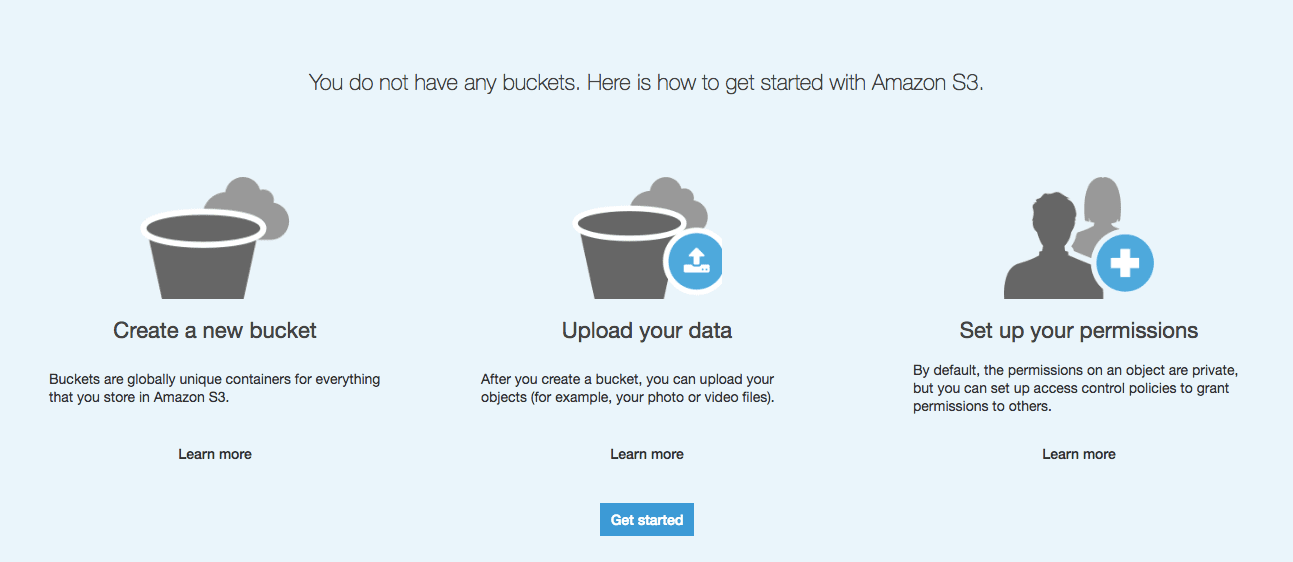
Choosing a bucket is much like choosing a server from a web host or CDN. The reason Amazon does this is so you can define unique settings for your storage environment, including geographic ones that may affect how easily you can gain access to your backups.
Also, buckets enable you to designate different settings for different kinds of websites (or clients). It’s up to you to organize this in a way that best fits your workflow and your clients’ needs.
For now, let’s walk through the process of creating a bucket and adding your data.
1. Create a Bucket
At the top of the page, click on the “+ Create bucket” button. This pop-up will appear:
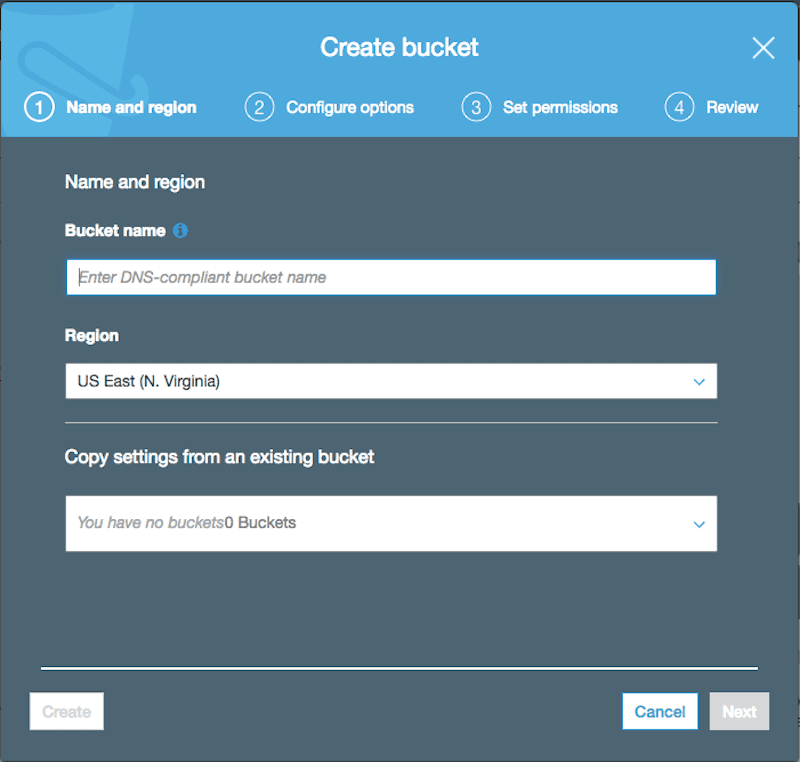
Give it a unique name. The domain name should suffice, but feel free to be as descriptive as you like.
Then, choose the region that’s closest to you. You won’t want to deal with latency issues when retrieving your WordPress backup to S3, so make sure the server is as close to you as possible.
As you create more buckets, you’ll have the option of duplicating those settings here. This will save you time as you configure your WordPress backup to S3.
Click “Next” when you’re done.
2. Configure the Bucket
You can configure a number of properties here, based on how you want to handle versioning as well as if you want to add encryption to the backup.
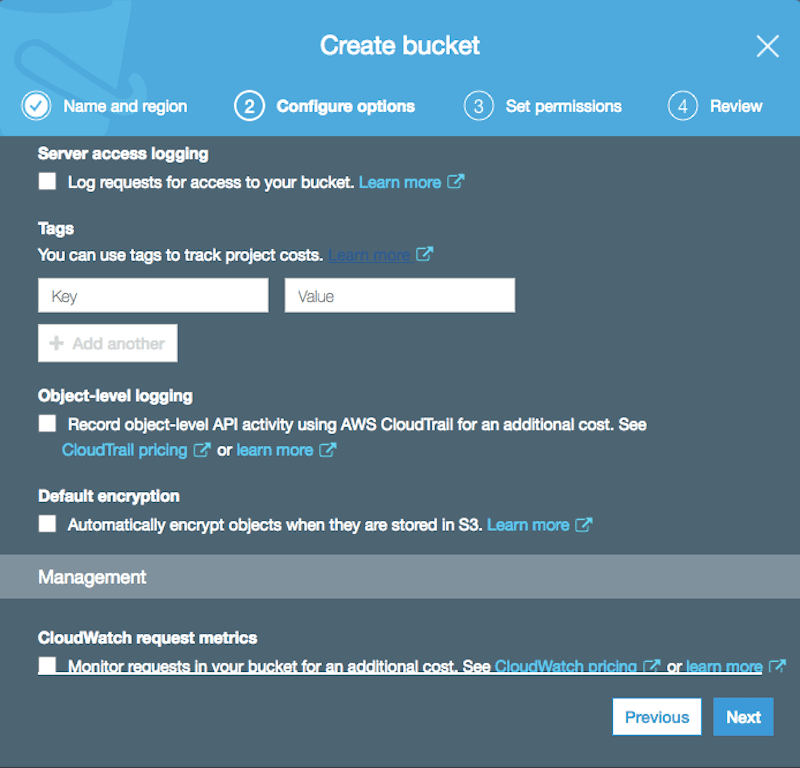
An interesting option you’re given here is under “Tags”. Basically, this allows you to create a unique tag for each website whose backup you maintain. If there are any associated costs with it, AWS will track it for you. This’ll make it easier to issue invoices when you have a clear record of costs to associate with the website.
3. Add Users
If you would like more than one user to access the WordPress backup to S3, you can set those permissions here.
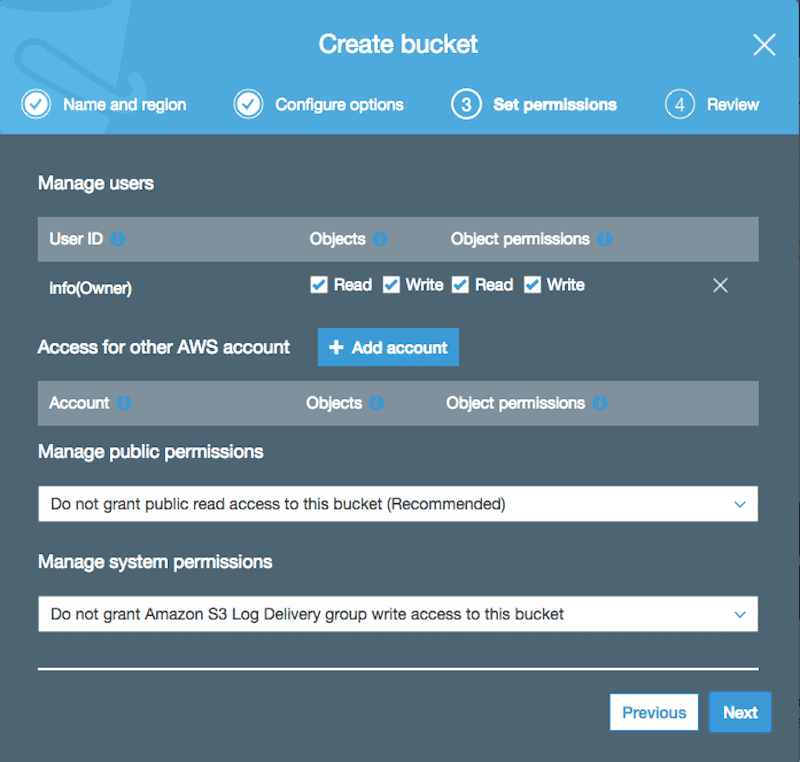
The only catch is that the user must have an AWS account as well.
Once you’re done filling this in, review the details of your bucket and finish.
4. Add Objects
From your list of buckets, choose the client whose site you want to save the WordPress backup to S3 for. (Just click on the name of the bucket).
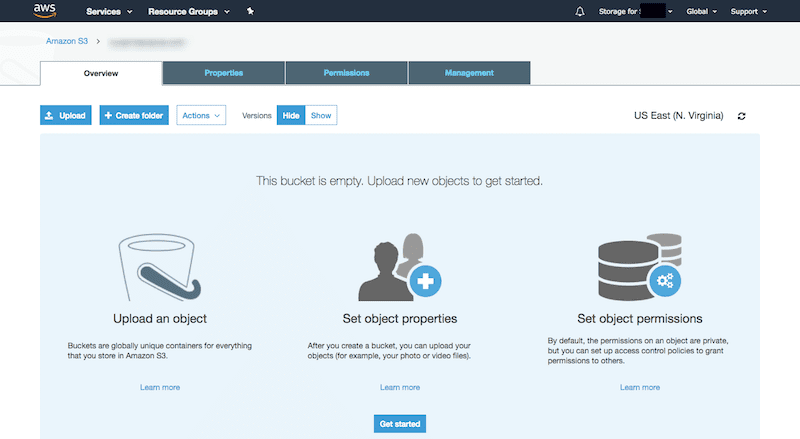
In this next screen, you’ll be asked to add objects to your bucket.
However, the reason we’re doing this tutorial isn’t so you can manually copy your WordPress site and save the zipped files to an external storage drive. You want to automate the WordPress backup to S3.
So, let’s retrieve the details UpdraftPlus is asking for and return to WordPress.
Step 4: Connect the Automatic WordPress Backup to S3
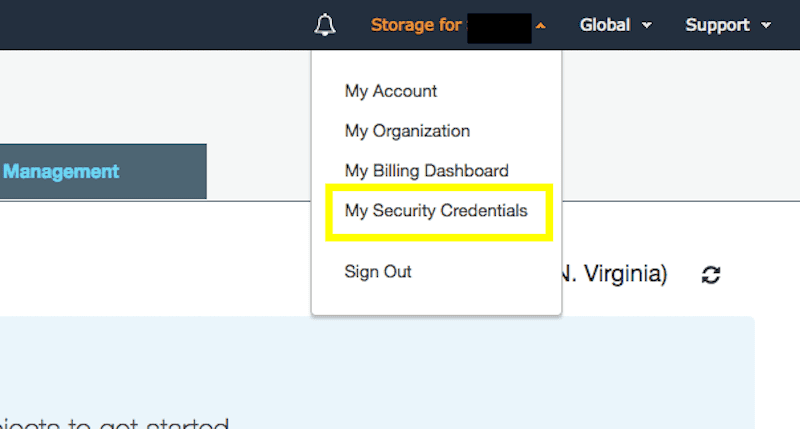
Locate the “Storage for [your name]” button in the navigation of the AWS dashboard. Then, choose “My Security Credentials”.
Open the “Access keys” section.
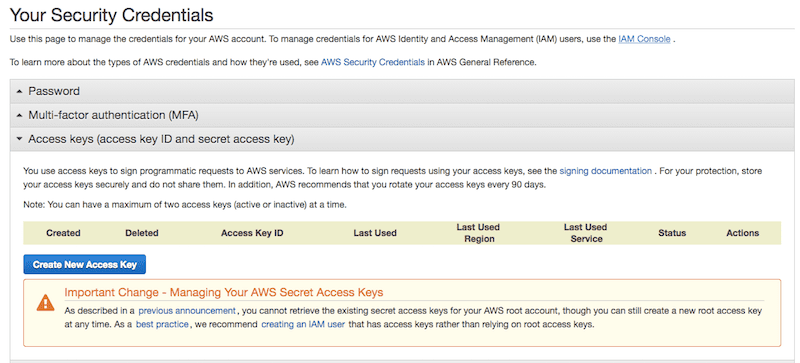
Click “Create New Access Key”. You can download it if you want to save a copy of it on your computer. For now, hit “Show Access Key”.
Copy the Access Key ID first. Then, return to WordPress and enter it into the relevant field inside the plugin.
Return to AWS and copy the Secret Access Key next. Add it to the corresponding field in the plugin.
Note that the plugin is also asking you for the S3 location. What this should really say is “S3 bucket”. In this field, input the name of the bucket exactly as it’s written in your S3 dashboard.
Click the “Test S3 Settings” button to confirm that you’ve established the connection correctly.
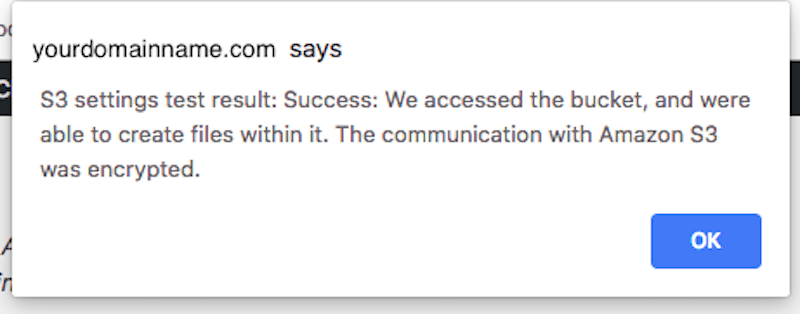
With your successful test, scroll down and save your settings. This is how you will automate your WordPress backup to S3.
Step 5: Use the Plugin to Save and Restore Backups
With UpdraftPlus and S3 now configured to speak to one another, your WordPress site can begin securely storing backups on Amazon’s servers.
Restoring Backups from UpdraftPlus
To find a list of all backups that have been generated, visit the Backup / Restore tab in your UpdraftPlus plugin. Scroll down to the Existing Backups list.
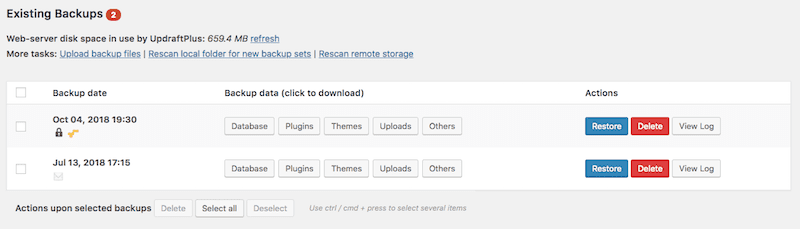
Here you will find the number of backups you’ve asked the plugin to store at any given time. Details provided include:
- Date saved
- Files included
- Actions: Restore, Delete, or View Log
If you prefer to handle this manually, you can download each of the files by clicking on the ones you want.
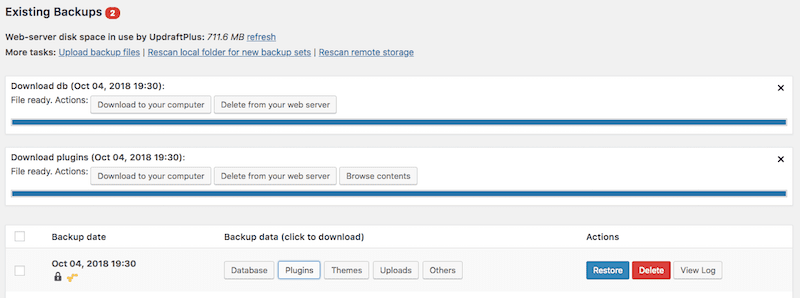
As you click on each, a “Download” section will appear above. You can then download the files and manually upload them to your database using a file manager or FTP.
To restore any of these backups with the plugin, simply click the “Restore” button next to the one you want. Then, allow the plugin to walk you through the process. You’ll be asked if you want to restore the site in full or if you only want to restore some of the files. Choose what you need and run the plugin.
Restoring Backups from UpdraftCentral
Your UpdraftCentral account (if you created one) will also display your backups:
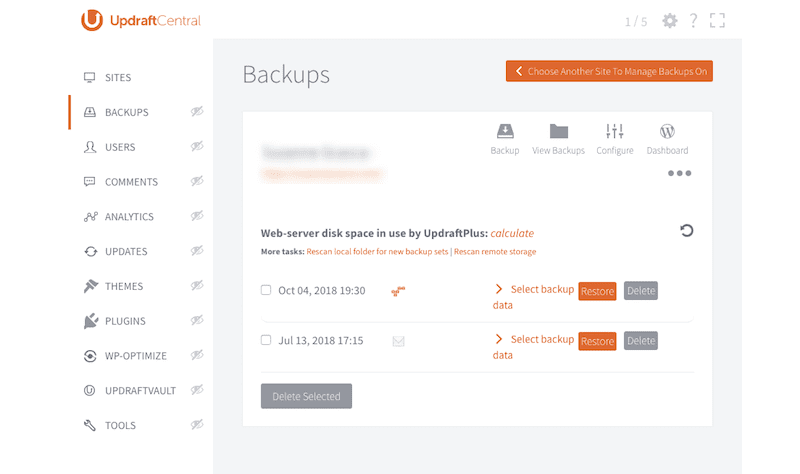
It includes all of the same options as the plugin does. Restoration of your WordPress website is handled in the same manner, too.
Restoring Backups from S3
Finally, you can log into your S3 account and retrieve the files there as well.
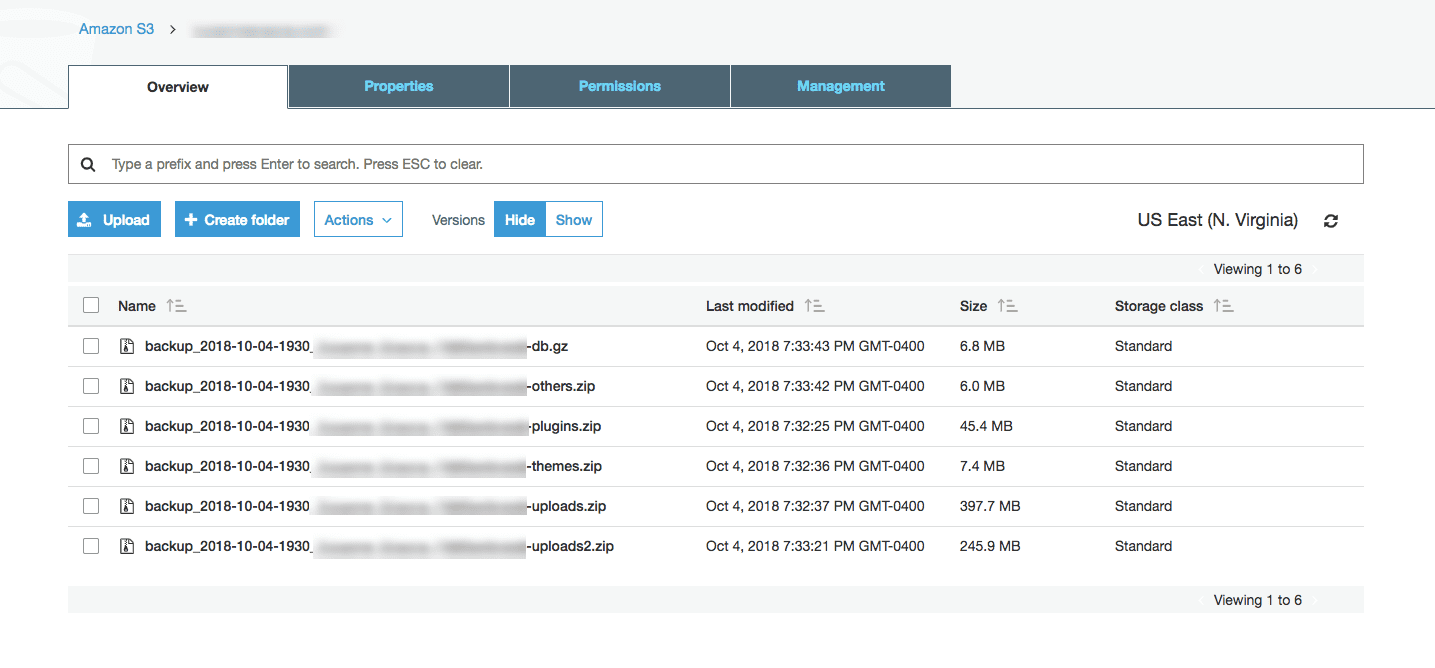
You’ll find them stored inside your bucket as loose “objects” (or files).
[bctt tweet=”????️ Unlike the plugin options, pulling directly from S3 will require you to manually upload them to your database. In all fairness, this is the safest option when conducting a restore. #WordPress” username=”thewpbuffs”]
While using the plugin to restore a downed or irrevocably harmed website will work for smaller sites, a site with complex functionality or a large number of files should be handled with care. And the manual restore is the only way to ensure that happens.
Wrapping Up
What’s nice about allowing UpdraftPlus to handle the WordPress backup to S3 is that you can scale this solution alongside your client’s site. When it’s brand new, the free versions of the plugin and storage service will work just fine. Then, as their site and content grow, you can scale up with both tools.
As always, if you decide that you need an easier way of managing all of these backups for your clients, why not become a WP Buffs partner? You’ll still charge and make a profit off of backup and restoration services for clients, but we’ll handle all the work for you!
Want to give your feedback or join the conversation? Add your comments ???? on Twitter.