Noom_Studio / stock.adobe.com
It’s not possible to talk about WordPress updates without first addressing why we even need them in the first place:
As you can imagine, there’s a lot of concern over the security of this content management system–from the perspective of companies that conduct business through WordPress websites as well as consumers who engage with them. Now, it’s not like WordPress is poorly built or managed. In fact, WordPress has a team strictly dedicated to monitoring the platform and updating the software as soon as vulnerabilities are detected.
However, WordPress is the most popular CMS in the world, which makes it a prime target for hackers. Because of this greater exposure, WordPress websites regularly receive about three-quarters of all hacking attempts.

While there is a lot that goes into securing a WordPress website–like using an SSL certificate, securing your PHP, and conducting regular security audits – you absolutely need to prioritize keeping WordPress updated. If you utilize plugins and themes, then you need to update them as well. A failure to do so could jeopardize both your site’s speed and its overall security. The following WordPress update checklist will provide you with everything you need to know about this essential piece of your WordPress site’s security strategy.
The Ultimate WordPress Update Checklist
When it comes to placing the “blame” for this overabundance of WordPress security breaches, it’s not fair to point to developers who built or now maintain WordPress or its third-party integrations. In fact, most WordPress breaches can be traced back to user error.
Did you know that over 70% of WordPress installs currently do not run on the most current and secure version of the platform? These WordPress updates are released for a reason–WordPress now even automates minor security upgrades in order to ensure that users’ sites are safe from those known vulnerabilities.
Then there’s the matter of plugins and themes. 54% of all WordPress vulnerabilities can be traced back to plugins and 14% to themes. Unless there is a serious security issue detected within one of these, WordPress will not force an automatic update for all users. They’ll instead rely on developers to create a patch and send out an update notification.
Ultimately, it comes down to you remaining cognizant of your WordPress website, monitoring for updates as soon as they become available, and then implementing them right away. This is the only way to keep WordPress as safe as possible.
There are a couple of ways you can do this: through automation or manual updates. The following checklist will cover both methods.
How to Update WordPress with Automation
In 2013, WordPress was kind enough to gift us with automated updates. These are not universally applied, however, and will only occur with minor releases and the infrequent plugin or theme update that urgently needs pushing out. All major releases and other plugin and theme updates still need to be processed by you.
If you’d like to spare yourself the responsibility of doing that–without compromising your site’s safety–you can automate these updates. Here’s what you’ll need to do:
1. Schedule Backups
Even if you’re not manually processing each update, it’s still important to have regular backups of your site saved. You can do this by using a backup and restore plugin. This will ensure that you have something to roll back to in case something goes wrong during one of those automated updates.
2. Automate with a Plugin
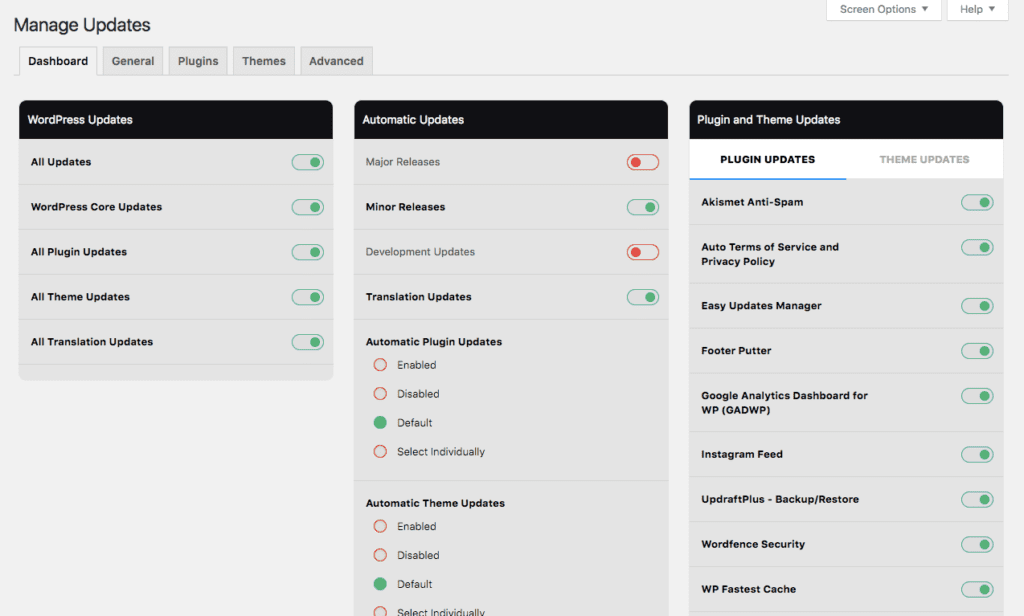
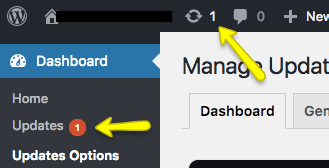
While you could log into WordPress each day and watch for the little notification at the top of the dashboard that says you have updates waiting, you can instead use a plugin to handle the work for you. Easy Updates Manager is a free plugin that you can use either on a single WordPress website or for a full Multisite network.
Once you have the plugin installed, you’ll need to configure the settings for it.
The dashboard (pictured above) will give you easy toggle on/off access to automating core, plugin, and theme updates for your site.
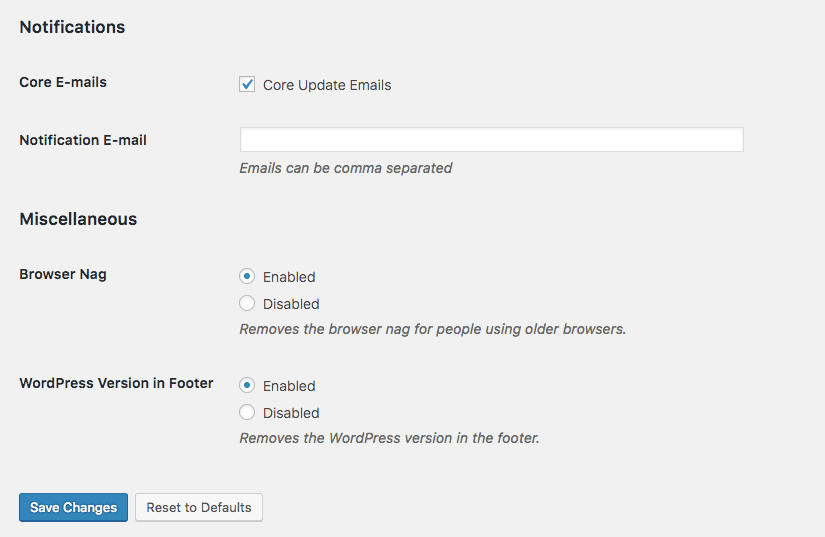
Pay special attention to the General Settings tab as well. While the top part of the page gives you the ability to set universal controls over what is automated and what’s not, the bottom part (Notifications and Miscellaneous) you might find particularly useful as well.
And don’t forget to look at Advanced Settings before you save and close up the configuration page. If you have multiple users who have access to your site, but you don’t want them to have control over these settings, you can adjust access levels there.
3. Or Automate Your Workflow
Rather than rely on one plugin to handle backups and one plugin to handle updates, why not use one tool that consolidates all that automation into one? ManageWP is a fantastic option for this as it enables you to:
- Manage all website updates–for as many websites as you want–from a single dashboard.
- Schedule daily backups and save to your preferred off-site destination. (This is actually our favorite feature!)
ManageWP also comes chock full of security features to help you better maintain the overall health and safety of your website without breaking a sweat.
As a WordPress maintenance service provider, we’ve found ManageWP’s solution to be incredibly valuable to our operations and workflow. With the enhanced visibility, convenience, and control we now have into all our website’s performance, security, and pending updates, we’ve been able to focus on growing our business (by 39%, in fact) rather than on trying to keep track of everything we have to do for each of our current clients.
How to Update WordPress Manually
There are two ways in which you can manually update your WordPress site.
When you know that you have updates waiting to be processed, you can click on the notification and update them with one click. However, in handling them this way, there isn’t much difference between automated updates and the manual processing of them. The whole point in taking ownership of this is to ensure that updates are handled with care and don’t put your site at greater risk. Here’s how to do it.
Update the WordPress Core
1. Back up Your Site
As soon as you see that an update is ready, capture a backup of your site (if you’re not content using the daily or weekly backup your plugin or maintenance service is saved). A backup and restore plugin will allow you to do this manually. You can then save a zipped copy of the backup file remotely in case you have to later restore it.
2. Deactivate Your Plugins
WordPress recommends that you always deactivate your plugins before manually updating the core. You can do this by going to your Installed Plugins list in WordPress, selecting all of the checkboxes, and applying the Deactivate bulk action.
3. Retrieve the Files
WordPress always stores the latest core version here. Upon receiving a notification that an update is available, visit that web page and download the files. Extract the package locally on your computer.
4. Update the Root
Log into your root directory using SFTP or SSH in your control panel. Delete the wp-admin and wp-includes files. You’ll then need to upload the new versions from your extracted core files.
5. Update wp-content
There’s no need to delete wp-content. Instead, what you need to do is make a copy of all the files within your new wp-content directory. Then place them into the old wp-content directory.
6. Update Everything Else
Your new core root files need to be copied over to your directory as well. It’s okay if they overwrite what was in there before (they’re supposed to).
7. Review wp-config
In your new core files, you’ll have something called wp-config-sample.php. Review this to decide if any of the new settings are worth saving to your wp-config.
8. Update the Database
Once your files are updated, log back into the WordPress admin. If WordPress needs to upgrade your database, it will send you to /wp-admin/upgrade.php. Proceed to the link and then complete the steps necessary to update your database.
9. Reactivate Your Plugins
Return to the Plugins list. Re-check all the deactivated plugins, then select the Activate bulk action.
In order to see any updates made and complete the WordPress core upgrade process, clear your browser’s cache.
Update Plugins and Themes
The process of manually updating your plugins and themes is similar to the core, just a little less labor-intensive.
1. Back up Your Site
See notes above.
2. Retrieve the Files
Grab a copy of the zipped files for your new plugin or theme from the repository or the developer. Download and unzip them on your local machine.
3. Delete the Old Files
Using SFTP through your control panel, locate your old files. You’ll find these under wp-content. Delete the old theme or plugin files.
4. Add the New Files
Add the new files to the wp-content directory. The plugin directory should end up looking like this: wp-content/plugin/plugin-name/. The theme directory will look like this: wp-content/theme/theme-name/.
5. Review the Changes
Return to WordPress and visit your Plugins or Themes list. It will tell you whether or not you have successfully made the update. Of course, review your site at this time to ensure that nothing breaks in the process.
A Small Reminder…
There is one other option available and that’s to hire a WordPress maintenance company like WP Buffs. In addition to regular maintenance responsibilities, this security and update piece features heavily in our services. If you like the idea of an expert managing daily WordPress backups and processing theme and plugin updates on your behalf, don’t forget this option exists as well.
And if you need another security resource, go ahead and read this article over at BloggingWand.
Want to give your feedback or join the conversation? Add your comments ???? on Twitter.


