LAYHONG / stock.adobe.com
Did you know that images make up 63% of the size of an average web page? That means if you want to make your website faster, one of the best things you can do is speed up image loading.
Faster websites have:
- Happier visitors because slow load times frustrate users.
- Better search engine rankings because site speed is a ranking factor.
- Higher conversion rates, which means more money in your pocket.
But how do you actually speed up image loading and reap the benefits of a faster WordPress website? Well, you follow the tips I’m about to lay out. Let’s dig in.
Before Your Start – Get a Benchmark to Compare Against
Don’t worry – I am going to show you how to speed up your site and its images. But I want to prove to you that this stuff actually works. So I’m going to ask you to do me a favor before we start:
Figure out how long your site takes to load right now. Beyond acting as proof that I know what I’m talking about, this gives you a benchmark to compare against. That way, you don’t need to guess whether or not a change actually sped up your site. You’ll have the data to know for sure.
But how do you test how long it takes your site to load? Ok, you’re going to need a stopwatch and a quick finger…wait, no. That doesn’t sound like a good idea. How about an automatic way to do it?
Try this instead – head to Pingdom Tools, plug in in the URL to your site, and click the Start Test button:

Then, Pingdom will spit back exactly how long it took your site to load.
Whatever number you get is the number you should expect to beat after you finish reading this post!
My portfolio site (the example) is already pretty well optimized – I hope that you see similar page load times once you implement these tips…
1. Resize Images Before Using Them
No matter which WordPress theme you’re using, your theme will only be able to display images up to a certain maximum width. That means that if you’re uploading images with dimensions beyond that max width, you’re slowing down your site in two ways:
- You’re making your images’ file sizes larger than they need to be.
- You’re making your visitor’s web browser work to resize the image.
Neither is a good thing if you’re looking to speed up image loading! So to fix the issue, make sure to always resize your images before uploading them.
What dimensions should you use? Well, the exact dimensions depend on your WordPress theme, so I can’t give a blanket answer. But as a general rule, somewhere in the range of 700-800px wide works for most WordPress themes.
How to Resize WordPress Images
There are two easy ways to resize WordPress images.
First, you can install a plugin like Imsanity that will automatically resize the images that you upload to your WordPress site.
Second, if you prefer a non-plugin solution, you can use Batch Image Resizing Made Easy to easily bulk resize images. Just make sure you choose Auto-height so that the tool doesn’t crop your images during the resizing process:

If you’re working on an existing site, you should also go back and resize as many old images as possible. The Imsanity plugin can help you with bulk resizing existing WordPress images.
2. Compress Images To Save Even More Size
Ok, so resizing your images’ dimensions is half the battle. But you can go even further to shrink the file sizes of your images with something called compression. Compression works to shrink sizes in two possible ways:
- Lossless Compression. Shrinks file sizes without any loss in quality.
- Lossy Compression. Offers greater size savings, but at the expense of some quality.
Normally, I recommend lossless compression for photographs or other images where quality is of utmost performance. But for something like tutorial screenshots (such as the images in this article), I would recommend going with lossy compression for the most size savings.
[convertkit form=2644196]
How to Compress WordPress Images
Like with resizing images, you can either grab a plugin to help you out or use a standalone tool.
As far as plugins go, Smush Image Compression and Optimization is a great option because, in its latest release, it can both compress and resize your images.
If you’d like a standalone site, Kraken is another solid option that lets you compress images via both lossless and lossy methods:

I know it’s a pain, but just like with resizing images, you should go back and compress as many old images as possible. If you’re using the Smush plugin, it can automatically compress old images as well as new ones.
3. Use a CDN to Deliver Your Images and Other Content
A CDN, short for content delivery network, speeds up your site and image loading like this:
Normally, when someone visits your website, they have to download all of the files from your hosting data center. If your data center is located in Dallas, TX and someone visits from California, that’s fine. They’re still pretty close to each other!
But what if someone visits from London, UK? Now, that’s not so good. See, as fast as the Internet is, data speeds are still limited by physics. That is, physical distance matters, if only by a fraction of a second.
CDNs solve this problem by storing your website’s files at multiple data centers around the world. Then, whenever someone visits your site, they can download your files from whichever global data center is nearest to them.
They’re a pretty awesome tool to speed up your site. But how much is that gonna cost?
Don’t worry! You can actually find quality free CDNs. Two such options are:
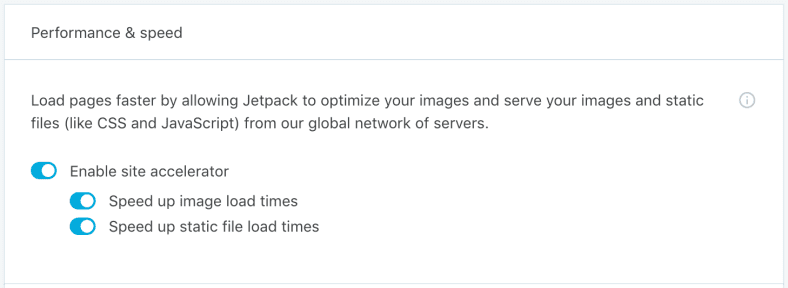
- Jetpack Site Accelerator – the Jetpack plugin’s Photon module acts as a CDN for your images. If you only want to speed up image loading, it’s a good option.
- CloudFlare – a popular option that’s easy to set up and delivers all of your static files, including images and HTML.
4. Enable Browser Caching For Your Site
If you’ve ever used the Google PageSpeed Insights tool, the phrase “Leverage browser caching” probably haunts your dreams. That to say, it’s a common suggestion for speeding up your site.
Browser caching basically tells your visitor’s browser to store certain files on your visitor’s local PC, instead of downloading the files every single time. So, for example, your visitor would need to download your logo image on their first visit. But on every subsequent visit, your visitor would load that file from their local cache.
That means faster load times because your visitor doesn’t need to get everything directly from your server.
The easiest way to set up browser caching is to simply add the following code to your .htaccess file:
## EXPIRES CACHING ##

<IfModule mod_expires.c>

ExpiresActive On

ExpiresByType image/jpg "access 1 year"

ExpiresByType image/jpeg "access 1 year"

ExpiresByType image/gif "access 1 year"

ExpiresByType image/png "access 1 year"

ExpiresByType text/css "access 1 month"

ExpiresByType text/html "access 1 month"

ExpiresByType application/pdf "access 1 month"

ExpiresByType text/x-javascript "access 1 month"

ExpiresByType application/x-shockwave-flash "access 1 month"

ExpiresByType image/x-icon "access 1 year"

ExpiresDefault "access 1 month"

</IfModule>

## EXPIRES CACHING ##
You can find your .htaccess file by using an FTP program to connect to the root directory of your server. Or, if you’re confused where to find this file, your web host’s support can help you out!
5. Make Sure You’re Using a Plugin for Page Caching, Too
Browser caching isn’t the only way to speed up your WordPress site. There’s also something called page caching, which makes it easier for your site to serve up content. Best of all, page caching will both speed up image loading as well as speed up the rest of your site, too!
To implement page caching, I recommend a plugin called Cache Enabler because it’s lightweight and easy to set up. Just install and activate it. Then, head to Settings → Cache Enabler and configure it like this:

Best of all, Cache Enabler will also minify your code, which is another technique to reduce page load times.
6. Disable Hotlinking For Your Images
Hotlinking is when other websites post images that are hosted on your server. Basically, it makes your web server use resources to make someone else’s site better. That’s not good!
That’s why you should consider disabling hotlinking. That way, your server can focus exclusively on your own website.
To disable hotlinking, you can either use the All In One WP Security & Firewall plugin or add the following code to your .htaccess file (the same file you added browser caching to):
RewriteEngine on

RewriteCond %{HTTP_REFERER} !^$

RewriteCond %{HTTP_REFERER} !^http(s)?://(www.)?yourdomain.com [NC]

RewriteRule .(jpg|jpeg|png|gif)$ – [NC,F,L]
Just make sure to replace yourdomain.com with your actual domain name!
7. All Else Fails – Choose A Faster Host
Everything I listed above will make your site and images load faster. But there’s something all of these tips can’t overcome:
Slow hosting.
If you have a web host with slow response times, all these tips are mere bandaids. That is, your site’s speed will always be handicapped by your host’s performance.
So if you’ve implemented everything above and are still disappointed with your page load times, it might be time to bite the bullet and switch to a premium hosting provider.
Or if you’re looking for a cheaper but still effective options, I’m a huge fan of SiteGround. SiteGround is what I use for my personal portfolio site that loads in under 700 ms.
Wrapping Things Up
I’ll take a quick pause while you go back to Pingdom and test your site again.
Are things faster? They should be!
And with that, you’ve set your website up for success both now and in the future. Because as mobile Internet continues to grow, page load times will only become even more important.
Want to give your feedback or join the conversation? Add your comments ???? on Twitter.