Knut / stock.adobe.com
When you’re customizing a WordPress site, there are some important tasks to take care of from the off, such as optimizing your header and creating custom menus. However, arguably just as important yet sometimes overlooked, is learning how to edit a footer in WordPress.
There are plenty of ways to change the footer to achieve a better User Experience (UX) and overall quality of design. You can modify it for both aesthetic and functional purposes, including replacing the WordPress-branded copyright text, adding links, and adjusting the format. Plus, there are a variety of methods you can use.
In this post, we’ll explain what a footer in WordPress is and reasons for changing it. We’ll also walk you through four ways you can edit the footer in WordPress, show you how to add social media icons to it, and answer some Frequently Asked Questions (FAQs). Let’s get started!
In This Article ????
- What Is a Footer in WordPress?
- Why Change the Footer in WordPress?
- How to Edit a Footer in WordPress (4 Methods)
- How to Add Social Media Icons to a WordPress Footer
- FAQs About Changing the WordPress Footer
- Wrapping Up
What Is a Footer in WordPress? ????
WordPress websites consist of four sections: the header, body, and footer, and sometimes a sidebar. Located at the top of the site, the header is one of the first things website visitors notice:
It’s essentially the masthead of your site and typically appears on every page. As such, it’s where you want to put critical elements such as your logo, menu, and Call To Action (CTA).
The WordPress footer shares many similarities with the header. Both are usually fixed sections that display across your site’s pages, and contain important information. Of course, a key difference is that the footer is located at the bottom of the site:
Typically, footers include a sitemap, links to legal disclaimers, company information, and similar ‘formal’ elements. Some examples include:
- Privacy policy and Terms of Service
- Affiliate programs
- Copyright information and date
- Resource sections
- Contact details
The footer content of your website is (logically) stored in the footer.php file of your WordPress theme. As we’ll discuss throughout this post, your theme influences your footer formatting, styling, and feature options.
Why Change the Footer in WordPress? ????
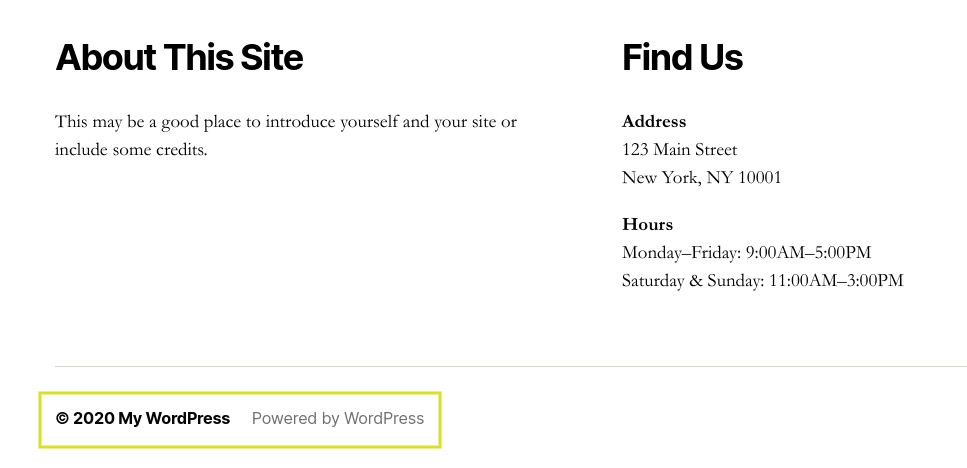
When you first install WordPress, you’ll notice default themes (in this case, Twenty Twenty) include WordPress-branded footer copy:
While there’s nothing particularly wrong with this, there’s also nothing special (or beneficial for you) about it either. Considering the footer appears on every page of your site, incorporating your own branding is a more effective use of the space.
Beyond the copyright and credit text, other motivations for editing the footer may include:
- Changing the footer colors or adding your logo to strengthen your branding
- Adding multiple columns or displaying a footer mega menu rather than the default two columns
- Including social media icons make cross-channel connections easier
Learning how to edit a footer in WordPress can help you maximize engagement and reduce bounce rates. You can strategically organize it so visitors are able to quickly find what they’re looking for. Ultimately, a carefully crafted, feature-rich footer can boost customers’ perception of your brand.
How to Edit a Footer in WordPress (4 Methods) ????
There are multiple ways to edit a footer in WordPress. The one you should use depends on a few factors, such as your WordPress experience, the theme you’re using, and the changes you want to make. Let’s take a look at how to edit a footer in WordPress using the following four methods:
- Changing the Footer Settings via Theme Customizer
- Using Footer Widgets
- Installing a Plugin
- Editing the Code in Your footer.php File
1. Change the Footer Settings via Theme Customizer
The quickest and most beginner-friendly way to edit a footer in WordPress is through the WordPress Theme Customizer. This is an effective option if you’re not comfortable working with code or don’t want to use a plugin.
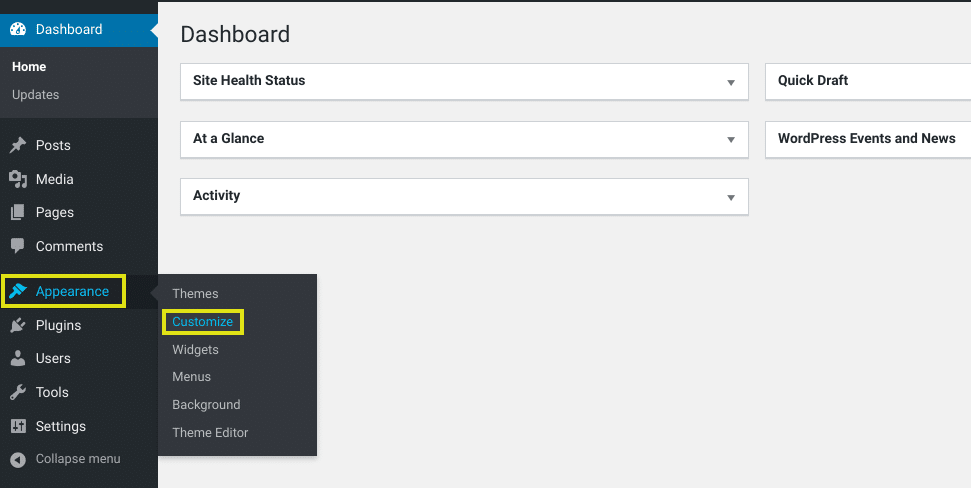
However, whether this tool is available to you depends on the theme you’re using, although most do. To locate the Customizer from your WordPress dashboard, navigate to Appearance > Customize:
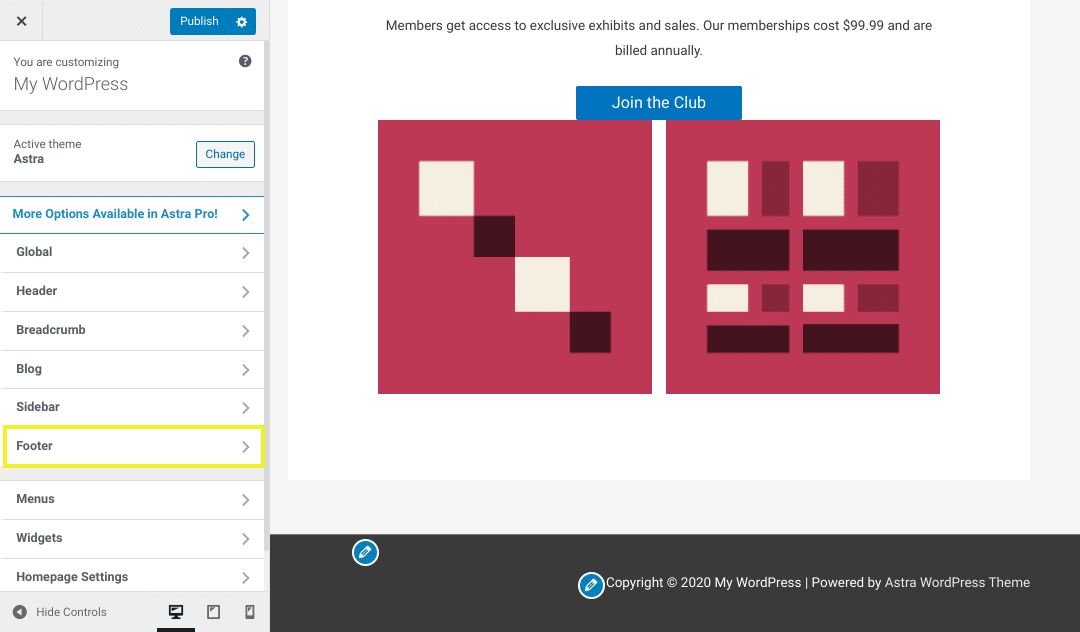
With the Customizer open, navigate to the ‘Footer’ section:
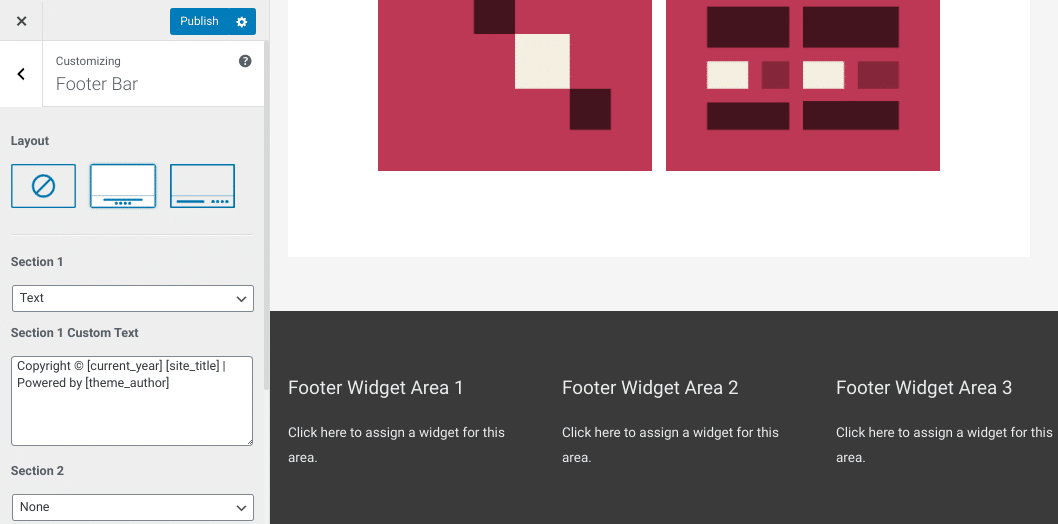
We’re using the Astra theme in our examples, so the features we discuss could vary depending on your chosen theme. For example, you may find the footer options under the Menus tab. Regardless, most themes let you change the footer layout, colors, and content:
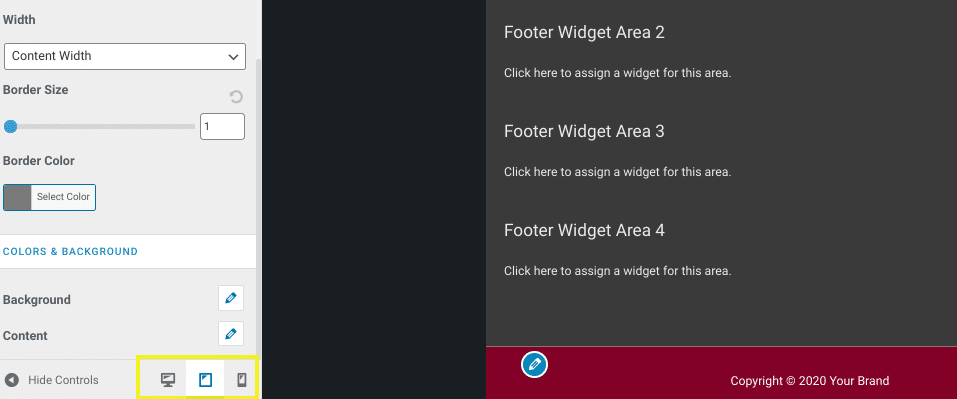
The Customizer also lets you preview the changes in real-time. You can use the controls at the bottom left to see how it looks on different screen sizes:
When you’re done making changes, select the Publish button. If your theme doesn’t give you the option of using the Customizer, there are other methods you can use.
2. Use Footer Widgets
Some themes, including Astra, let you add and modify footer widgets directly in the Customizer. However, if you don’t have access to this, you can still use WordPress widgets to change your footer.
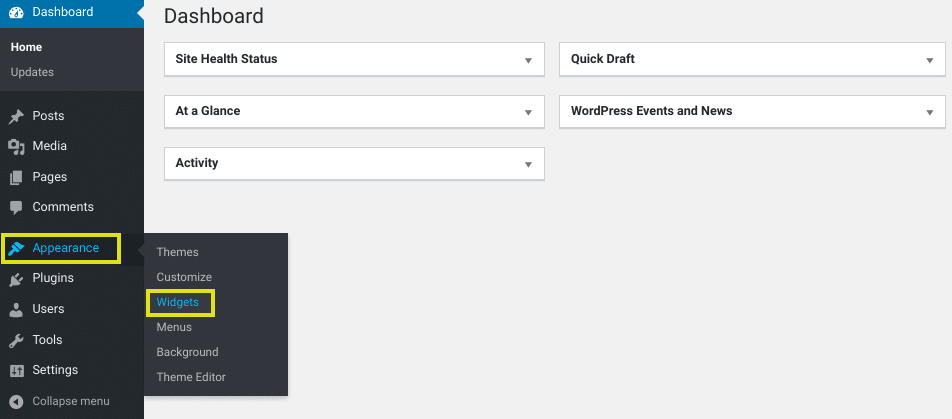
To do so, browse to Appearance > Widgets from your WordPress dashboard:
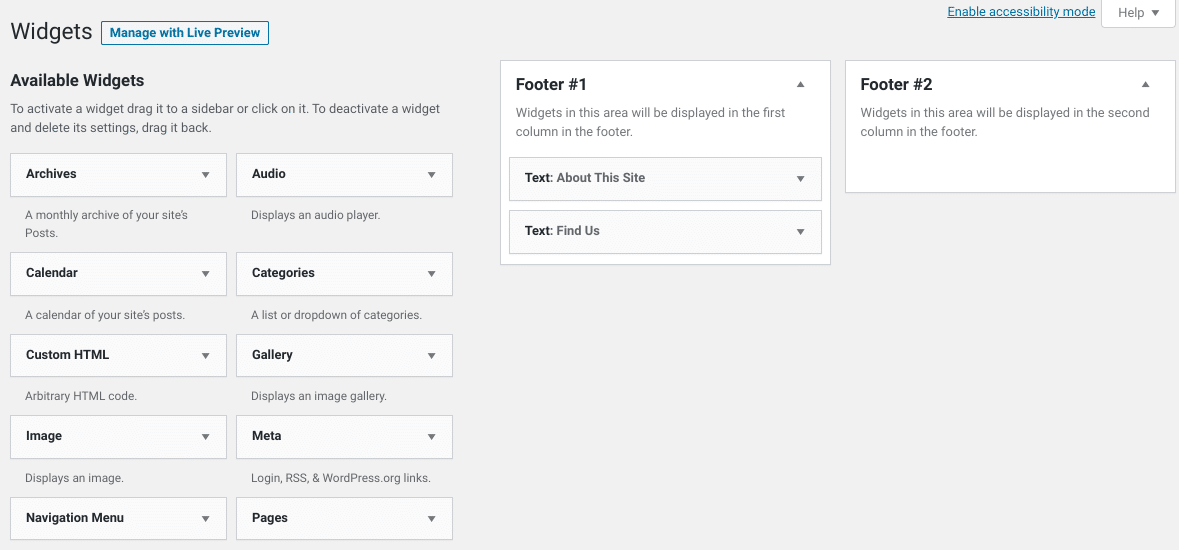
All available widgets are listed to the left. Again, your specific options may look a bit different depending on the theme. However, WordPress default themes such as Twenty Twenty offer two footer widget sections, located on the right:
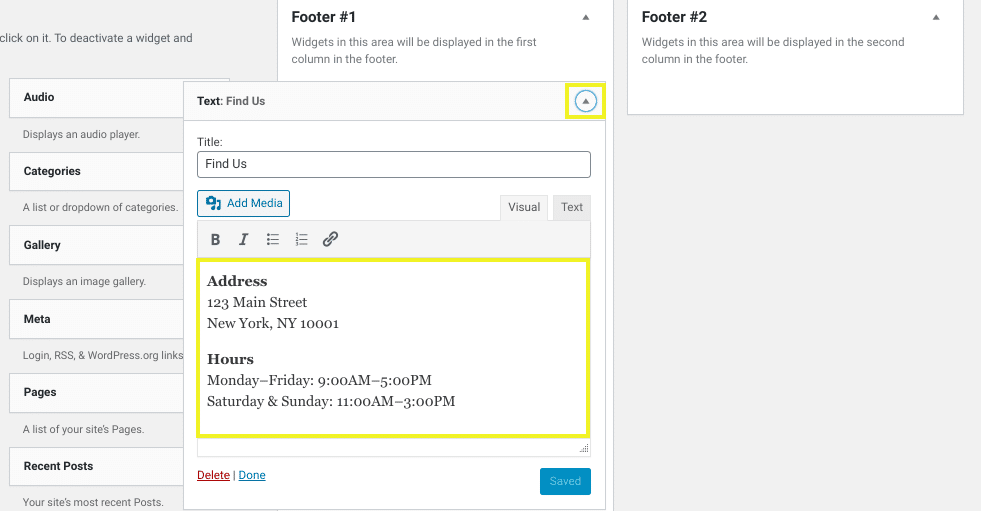
To edit the content of a footer widget, simply click on the arrow of the Text item to expand the field:
Changes can be made using the visual or text editor. When you’re done, click the Save button.
To entirely remove a widget, select Delete. Conversely, you can add a widget by dragging it from the list on the left and dropping it under the appropriate footer section.
3. Install a Plugin
If you’re trying to figure out how to edit a footer in WordPress without dealing with code or the Customizer, consider using a plugin. WordPress plugins are an effective way to expand the features and functionality of your site, including the footer area.
There are a variety of plugins you can use depending on what you’re trying to achieve. One to consider is the Elementor Header, Footer, and Blocks template builder plugin:
This free extension, an add-on to the Elementor Page Builder plugin, lets you quickly and easily change the footer in WordPress via its drag-and-drop builder. In addition to designing and adding a main footer, you can leverage the ‘Before Footer’ template to expand the footer section.
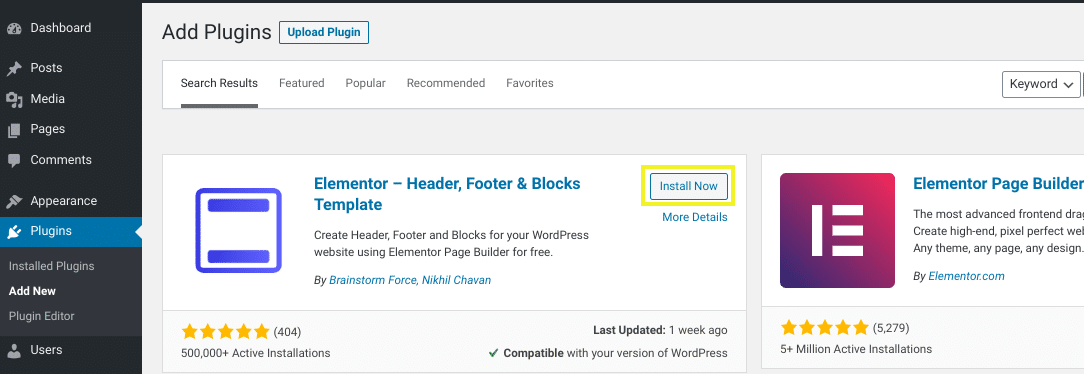
You can add the Elementor Header, Footer, and Block plugin by going to Plugins > Add New, then searching for “Elementor footer”. Click on Install Now, followed by Activate:
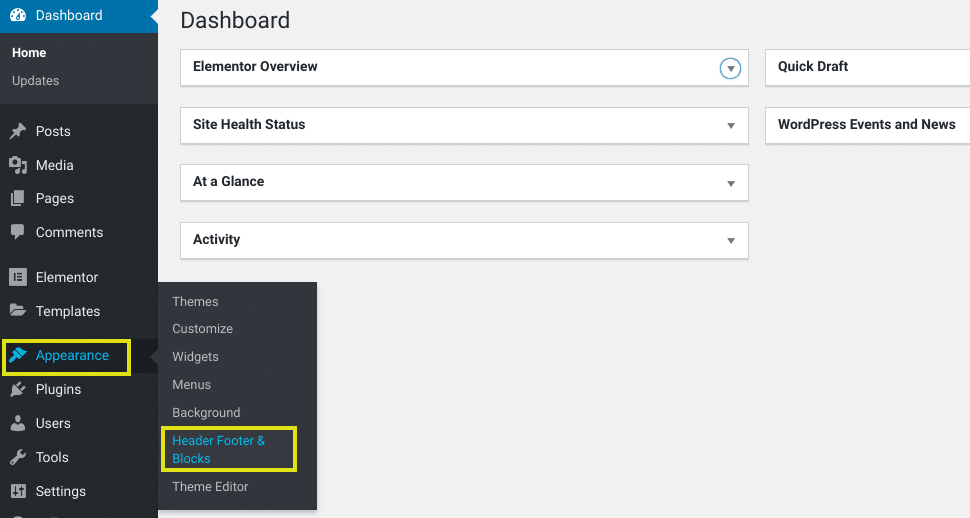
Once you activate the plugin, you can locate it by going to Appearance > Header Footer & Blocks:
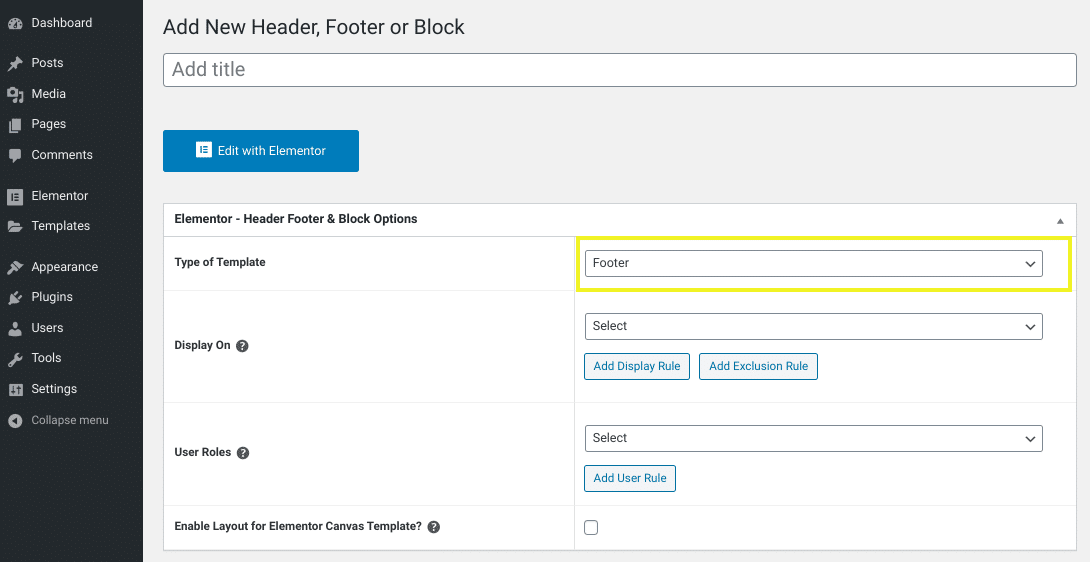
Select Add New. Then, from the drop-down menu next to Type of Template, click Footer:
There are a handful of settings and configuration options. You can customize where on your site the footer will display and implement specific display and exclusion rules.
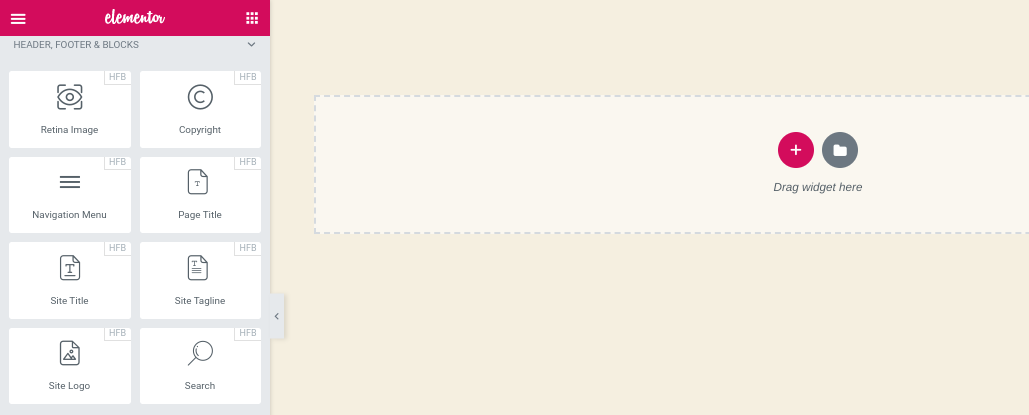
Next, click on the blue Edit with Elementor button at the top to go to the template builder. In the left panel, you will find the ‘Header Footer & Blocks’ section, where you can drag and drop footer widgets into the builder:
In this page and template builder, you’ll find a plethora of layout, features, and customization options for building a custom footer for your WordPress site. When you’re done, select Save at the bottom. For further guidance, check out Elementor’s documentation.
4. Edit the Code in Your footer.php File
The final method you can use to change the footer in WordPress is editing the footer code of your theme’s footer.php file. This is more technical than other solutions, so only use it if you’re comfortable working with code.
Also, before proceeding with this method, it’s important to note that you should avoid removing any lines of code from the file. The safer option is to either comment the code or create a child theme.
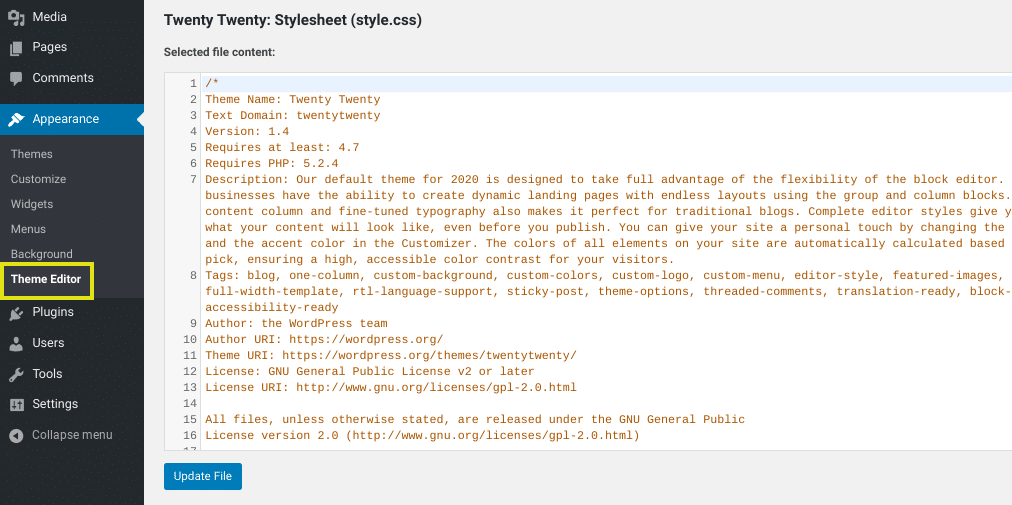
To locate the footer.php file of your WordPress theme, navigate to Appearance > Theme Editor:
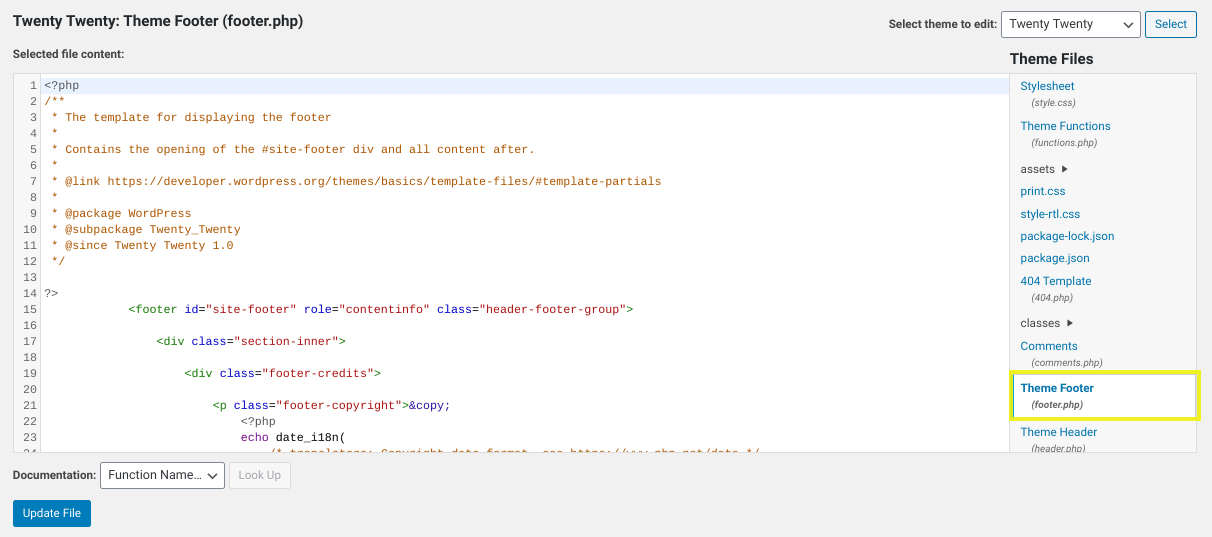
Make sure your current theme is selected. On the right is a list of your theme files. Look for Theme Footer (footer.php):
Within that file, add the code to modify the footer as desired. When you’re done, select the Update File button.
How to Add Social Media Icons to a WordPress Footer ????
There are a variety of ways you can add social media icons to your WordPress footer. Depending on your theme, you might be able to incorporate social media links and menus from the Customizer. Another way is to add the correct code to your footer.
However, we recommend the fast, beginner-friendly method, which can be used regardless of your WordPress theme. To add social media icons to your footer, first, install and active the Social Icons Widget plugin by WPZOOM:
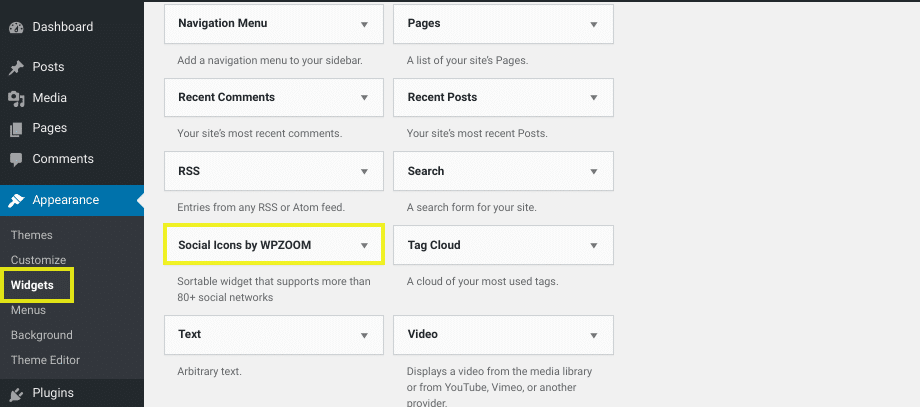
This plugin is free to use and gives you a ton of icon style options to choose from. Once it’s activated on your WordPress site, navigate to Appearance > Widgets from your admin dashboard:
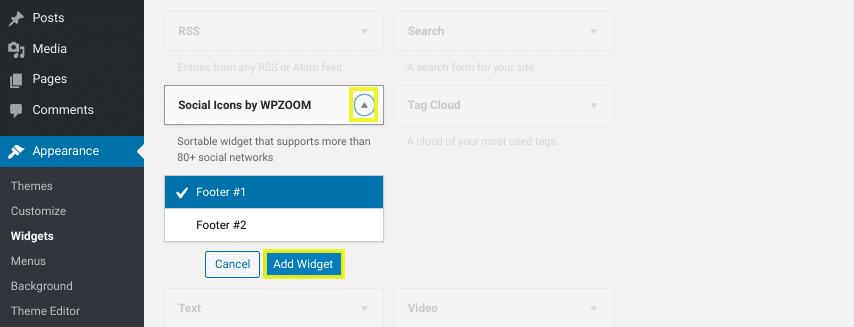
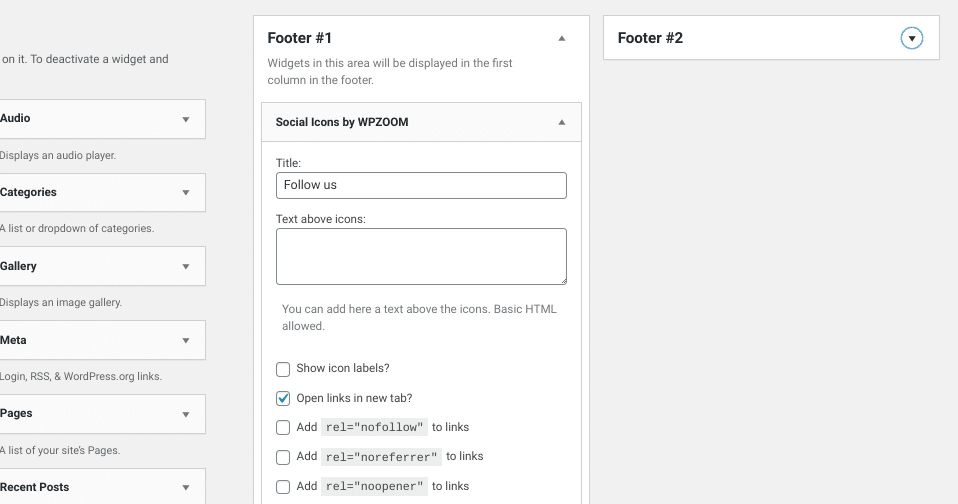
Click on the Social Icons by WPZOOM widget to expand it, select the footer section you want the icons to display in, followed by Add Widget:
The widget will open in the footer panel you selected to the right. Here, you can configure a variety of settings, including the icon colors, alignment, and size:
At the end of the dropdown, you can select which social icons to include and insert the URLs to your social accounts in the respective fields:
When you’re done, click the Save button. That’s it!
FAQs About Editing the WordPress Footer ????
Hopefully, you now feel confident that you know how to edit a footer in WordPress. However, to wrap things up, we want to answer a few FAQs about WordPress footers.
Does Every Website Need a Footer?
Technically, no. You can hide or remove the footer content if you wish. However, we wouldn’t recommend doing so. It may not be suitable for all pages on your site, but a WordPress footer can make vital information, pages, and CTAs accessible for your visitors.
Is It Legal to Remove the WordPress Footer Credit Text?
Yes, you can remove the default footer copyright and WordPress branded credit text without worry. WordPress is an open-source Content Management System (CMS), meaning you’re able to modify or change it any way you see fit. This includes removing the footer credit text and replacing it with your brand name and company information.
Can I Add Images to the Footer in WordPress?
Yes, you can add images in the WordPress footer. Some themes let you add a background image through the Customizer. However, if you want to add a single image, such as a logo, you can do so by dragging and dropping the ‘Image’ widget to the footer section.
Wrapping Up ⏲
The footer section located at the bottom of your WordPress site plays an important role in your site’s design and navigation. However, the default footer settings of your theme may not offer the best use of the space, in which case you can change them.
In this post, we discussed how to edit a footer in WordPress with the following four methods:
- Change the footer settings via the Customizer, which is available with most but not all themes.
- Install a plugin such as the Elementor Header Footer & Blocks plugin to change the footer without editing any code.
- Use the footer widgets to add, replace, or remove text and other elements.
- Edit the code of your footer.php file in the Theme Editor.
Updating your WordPress footer is one of the many enhancements you can make to your site. However, depending on how many sites you have, it can be time-consuming. At WP Buffs, we offer WordPress Care Plans and Maintenance Packages and white-label solutions that can make site management, maintenance, and customizations significantly easier! Check them out today!
Want to give your feedback or join the conversation? Add your comments ???? on Twitter!
Image credit: Pexels.


