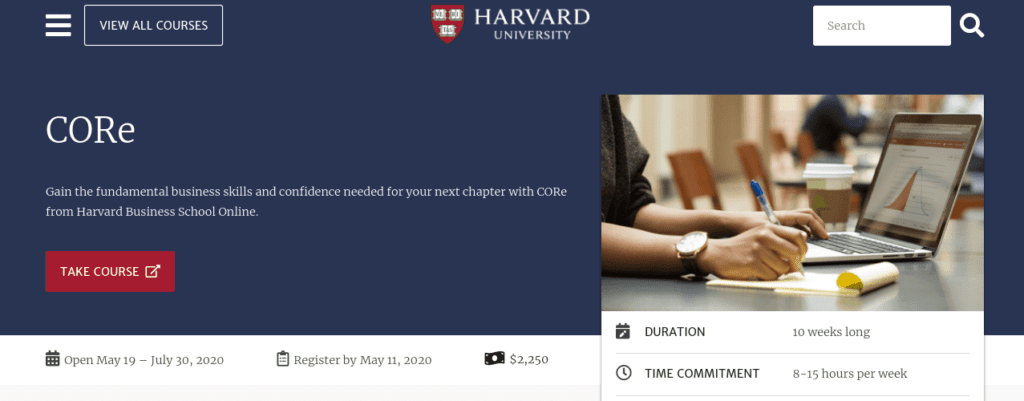
Whether you’re looking to move your classroom to a virtual environment or have an area of specialty you want to use to generate a revenue stream, an online course can help. However, it’s a misconception thatΒ creating an online courseΒ requires you to shell out a hefty sum of money.
This just isn’t true. In fact, you can create anΒ online course for free. Doing so doesn’t require a high level of technical knowledge or experience, either. It can be done by following a few simple steps.
In this post, we’ll explain what an online course is, the benefits of making one, and the different types you can create. Then we’ll walk you through how toΒ create an online course for free using WordPress. Let’s get started!
In This Article π΅π»
- What Is an Online Course?
- Why Create an Online Course?
- Types of Online Courses to Create
- What You Need to Create an Online Course With WordPress
- How to Create an Online Course for Free (In 7 Steps)
- Tips for Promoting Your Online Course
- Frequently Asked Questions About Creating Online Courses
- Wrapping Up
What Is an Online Course? βπ»
An online course is a course that can be used to teach someone a new skill orΒ information using digital technology. They are usually delivered entirely online, either free or for a fee.
Online courses are convenient becauseΒ they promote flexibility. Generally, students can complete the course from the comfort of their own home, typically for aΒ lower priceΒ than they would with a traditional class.
Additionally, online courses can be a powerful way to deliver and consume information because they make theΒ material engaging.Β For example, many involve videos, images, slideshows, and other multimedia and interactive elements.
Online course can be used for a wide variety of purposes. The most popular and common is byΒ colleges and universities:
They can also be used forΒ professional development and training. For example, you can use an online course as part of onboarding and training new employees or to offer certifications for certain skill sets:
However, educational institutions and large corporations are not the only users of online courses. You can also use them as a small business owner,Β entrepreneur, or freelancer.
Why Create an Online Course? π€·π½ββοΈ
Selling online courses is anΒ affordable way to increase your business’ revenueΒ or generate a side income. In fact, later in this post, we’ll show you how you can create an online course for free using WordPress.
Money aside, though, there are manyΒ benefits to creating an online course, including:
- It’s a simple, quick way to offer an valuable asset to your audience.
- You canΒ establish credibility and authorityΒ in your industry or niche.
- It presents an opportunity to grow brand awareness and expand your reach.
- You can incorporate it into your marketing pipeline to upsell or downsell other products and services.
To attract new customers, it’s important to bothΒ establish trustΒ andΒ provide quality content. Creating an online course can help you do that. You are offering something of value and appealing to audiences by alleviating a specific pain point they have.
Plus, you don’t have to have any formal teaching experience. You just need anΒ topic you’re knowledgeableΒ about and a willingness to learn how to create an online course for free. We’ll walk you through the rest.
Types of Online Courses to Create π
Before we teach you how to create an online course for free, it’s important to first understand the different options. Let’s take a look at some of the most popular types of online courses you can create.
Free Introductory Course
A free introductory course is a great way to get people interested in your topic. It can be used as aΒ lead generation toolΒ and be an incentive for users to purchase subsequent courses.
Free introductory courses are oftenΒ simple and primarily text-based. You can use them toΒ establish the basicsΒ of a topic. Plus, since they are typically used to set the foundation for later, more in-depth topics, they usually won’t take very long.
Certification Course
AΒ certification courseΒ is where you would present ‘graduates’ of the course with a certificate of completion. This can be particularly useful if you’re teaching someone a new or marketable skill. For example,Β HubSpot AcademyΒ offers dozens of free certification courses:
Including certificates with your online course can also be anΒ incentive for studentsΒ to sign up. It provides them with a reward at the end of their hard work.
Membership Course
AΒ membership courseΒ is when you offer one or more online courses as part of a subscription service. This is a great way to createΒ recurring revenue for your businessΒ and provide ongoing support to your community and users. Basically, users are granted access to the course content as long as they pay their membership fee.
If you only plan on creating one online course, this may not be the best option. However, as you grow more comfortable with making them, you might findΒ switching to a membership modelΒ makes sense.
Webinar
A webinar is a live online event that consists mainly ofΒ audio and visual communication. Users can sign-up to participate in the webinar in real-time or access the material at a later date. For example, at WP Buffs, we offerΒ webinars on all things WordPress:
Webinars can beΒ powerful marketing toolsΒ for promoting your online courses and other products and services. Also, by asking users to register for the webinar ahead of time, they can also be effective forΒ lead generation.
What You’ll Need to Create an Online Course With WordPress π§°
Before getting started, there areΒ some things you’re going to needΒ in order to create your online course. Let’s take a look at what those are.
Course Topic and Content
If you’re interested in creating an online course, the first step is to decide your topic. It’s important to choose an area you’re knowledgeable in, as well as something that there is a demand for. Spend some timeΒ researching the market and your competitorsΒ to see what type of online courses are currently being offered and to beginΒ brainstorming ideasΒ for your own.
Keep in mind that you don’t have to be an ‘expert’ in something in order to create an online course for it. It can simply be something you have anΒ extreme interest or passionΒ for.
With the topic in mind, you’ll also want toΒ create an outlineΒ to flesh out the idea. You can organize it into different sections and highlight the points you want to cover. It also helps to establishΒ clear learning objectivesΒ and outcomesΒ to ensure your course content stays focused and doesn’t overwhelm your students.
Once you have your outline, you can begin writing, gathering, andΒ preparing the course content. In addition to the text you’re going to use, this includes any images or training videos, as well as audio clips, you want to include in the course.
Target Audience
The more you know about your audience, the better positioned you’ll be to tailor the online course to them. If you ‘re using the course as an add-on to your existing business or website, you can use tools likeΒ Google AnalyticsΒ toΒ gather audience data and insights.
SomeΒ demographicsΒ to considerΒ include:
- Age
- Gender
- Level of education
- Income
This data can helpΒ inform many of the decisionsΒ involved in creating and structuring an online course. For example, if you’re targeting high income earners, you might feel comfortable selling your course at a higher price point than you otherwise would.
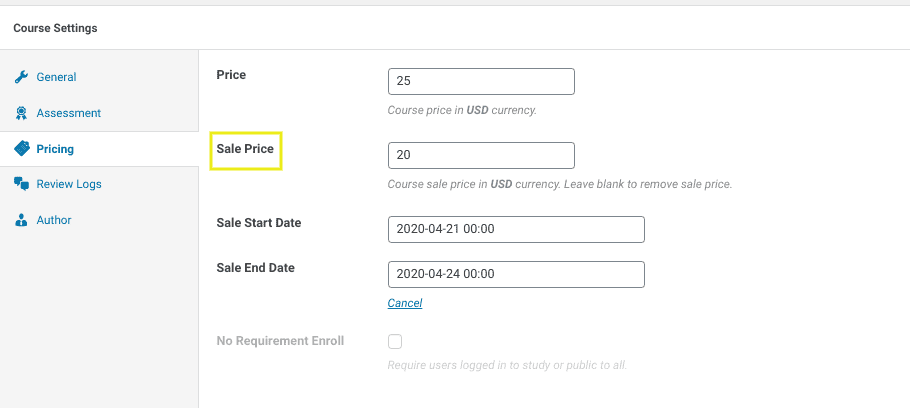
Course Restrictions and Distribution Method
Before you start building your online course, you might also consider theΒ distribution methodΒ you’re going to use. For example:
- Are you offering the course for free or charging a fee?
- If you plan on selling your course, will it be as a one-time purchase or part of a subscription orΒ membership fee?
- Will students need to enroll or signup for the course?
- Do you plan to release the material all at once or on a schedule using a ‘drip content’ method?
Deciding ahead of time how you plan to deliver and distribute your online course will helpΒ expedite the process. Also, the process for creating a free, public online course will involve a bit less than, for example, a membership site. The latter will require setting up payment gateways, deciding which content is available to which audiences, etc.
WordPress Site
There are many different website builders and platforms you can use to create an online course. However, if you want to earn money from your online course, we recommend using aΒ self-hosted WordPress site.
Thanks to the variety of plugins and themes available, WordPress makes creating an online course for free simple and straightforward. Plus, you’ll be able toΒ exercise more controlΒ over the course content and distribution than you would if you choose another type of platform, such as an online course marketplace.
Note: If you’re creating a new WordPress site to host your online courses, you’ll need to purchase aΒ domain nameΒ andΒ hosting plan.
π₯Thanks to LMS plugins, WordPress makes it easy to create an online course for free! #WordPress Click To TweetLearning Management System (LMS)
Another key aspect of creating your online course is choosing theΒ LMS technologyΒ you’re going to use. Essentially, the LMS is what allows you to turn your content into a course to sell on your WordPress site. There are a lot of premium LMS solutions out there.
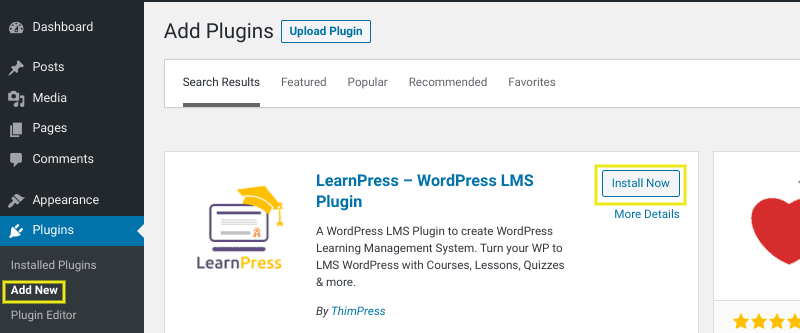
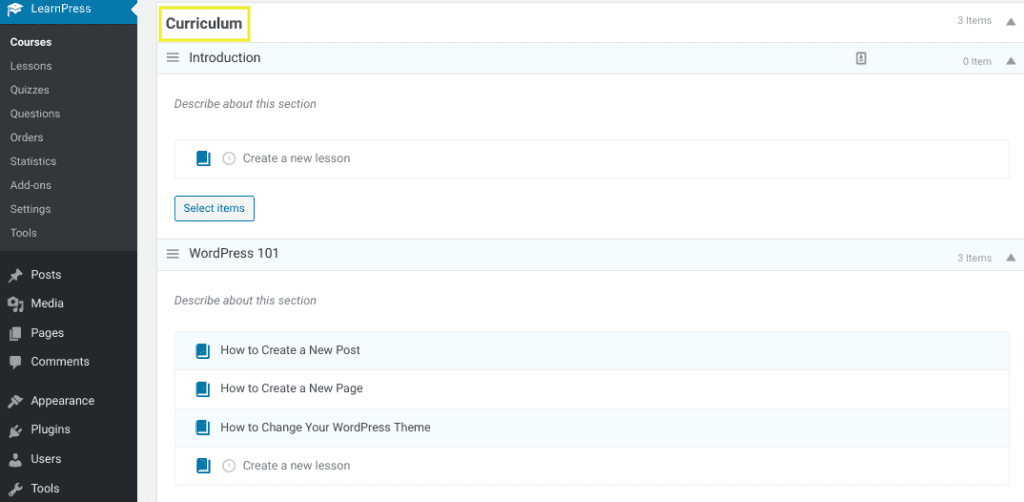
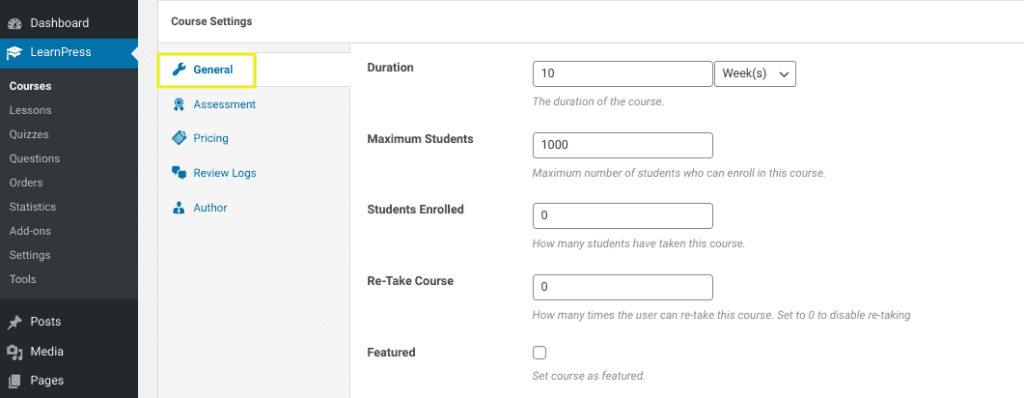
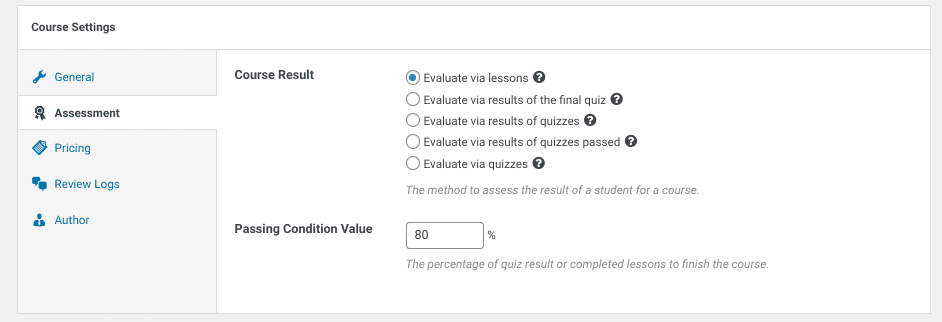
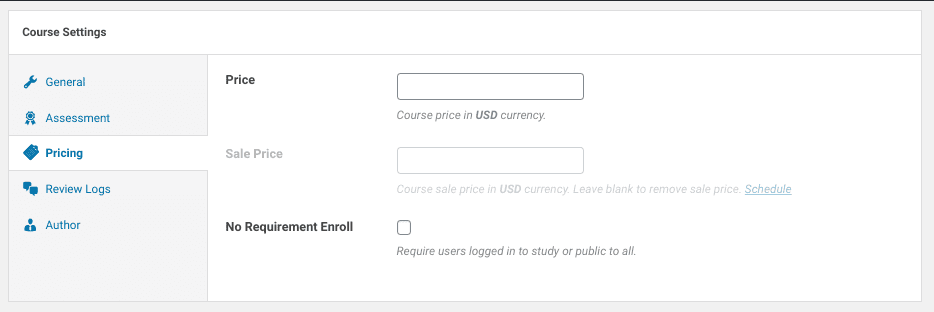
However, since we’re focusing onΒ free methodsΒ in this post, we’ll be using theΒ LearnPress WordPress LMS plugin:
LearnPress is a rareΒ free LMS plugin for WordPress sites. You can use it to create online courses, accept payments, and communicate with your students. You can also choose from a variety of add-ons, both free and premium, to extended the functionality of the LMS.
How to Create an Online Course for Free (In 7 Steps)π€
Now that we covered the basics of online courses, it’s time to get to the fun stuff. Let’s take a look at how you canΒ create an online course for freeΒ using WordPress in seven simple steps:
- Download and Install the LearnPress Plugin
- Create a New Course
- Configure the Course Settings
- Add the Lessons to Your Course
- Create Quizzes
- Link the Lessons and Quizzes to the Course
- Preview and Publish Your Online Course
Step 1: Download and Install the LearnPress Plugin
If you haven’t already, the first step is to download andΒ install a LMS pluginΒ to your WordPress site. As we mentioned, for this tutorial, we’ll be using theΒ free LearnPress plugin. However, even if you use a different, premium LMS plugin, the process will be relatively the same.
Navigate toΒ Plugins > Add NewΒ from your admin dashboard. If you downloaded the plugin from theΒ WordPress Plugin Directory, upload it by selecting theΒ Upload PluginΒ button. Alternatively, you canΒ search for it on the plugin page, then clickΒ Install Now, followed byΒ Activate:
Once it’s done installing, you’ll get a message notifying you that it was successful. Select theΒ Run setup wizardΒ button:
It will bring you to aΒ welcome screen. Click on theΒ Run setup wizardΒ once again to follow the prompts.:
The prompts it takes you through include:
- Currency, where you can decide the type of currency you want to accept for your online course and how it will display on your site.
- Static PagesΒ for you to choose which pages will display for your online course landing pages, such as the ‘Checkout’ page.
- PaymentΒ to configure the payment gateway you want to use to accept payments for your online course.
- EmailsΒ in which you can choose to enable the setting for automatically activating emails to your students.
Once you’re done working through these tabs, the last is theΒ FinishΒ page. On this screen, you’ll see a number of options:
You can either return to your WordPress dashboard, jump into creating your online course, orΒ install a sample course. We recommend installing a sample course so you can get a preview of how your online course would look on the frontend. Note: The appearance will be based on your current WordPress theme.
Step 2: Create a New Course
Once you’re done with the setup wizard and sampling the online course, you canΒ return to your WordPress dashboard.Β From there, navigate toΒ LearnPress > Courses > Add New:
You’ll notice this page looks very similar to a standard WordPress page.Β Enter a course nameΒ as well as a description of what the course is about.
As with typical WordPress pages, you have the option to add orΒ apply a category to your course. We recommend doing this is if you plan to create and distribute multiple courses because it can help keep you organized.
Next, under theΒ CurriculumΒ section,Β add your lessons and sections. This should be relatively quick if you created a course outline:
Note: For now, you can simplyΒ name the sectionsΒ (meaning the ‘lessons’) and provide a brief description or summary of what the lesson will include. We will flesh out the lesson content later step. Each lesson can be a new topic or subtopic of your course.
Step 3: Configure the Course Settings
After you’re done outlining the course curriculum, scroll down to theΒ Course SettingsΒ section. Here, you’ll find five tabs.
The first is theΒ GeneralΒ tab:
In this section, you can choose theΒ duration of your courseΒ in minutes, hours, days, or weeks. You can also set a limit for the number of students that can enroll in the course.
Next is theΒ AssessmentΒ tab:
This is where you can chooseΒ how you’re going to evaluate studentsΒ who take your online course. You can learn more about each option by hovering your mouse over the question mark at the end of the item. However, you can keep the first one selected if you don’t plan on using quizzes to distribute grades.
Next, you’ll move to theΒ PricingΒ section:
This is where you canΒ determine and set a price for your course. If you plan to make it free and accessible to the public, you can select the box next toΒ No Requirement Enroll.
The remaining two tabs areΒ Review LogsΒ andΒ Author.Β UnderΒ Review Logs,Β you can manage the reviews that your online course gets. For now, this isn’t something you have to worry about seeing as it won’t have any reviews yet.
Similarly, theΒ AuthorΒ section simply contains your email. Make sure toΒ click on theΒ Save DraftΒ buttonΒ in the top right-hand corner when you’re done.
Step 4: Add the Lessons to Your Course
At this point, we’veΒ built the frameworkΒ for your online course. However, it still needs to be filled out with the meat of your course content, meaning the lessons.
Navigate toΒ LearnPressΒ >Β LessonsΒ from the WordPress dashboard:
On this screen, you’ll see aΒ list of all the lessonsΒ that you added to your new course, as well as any that were included with the sample course you installed from the setup wizard. To begin adding content to a lesson, select theΒ EditΒ link under the lesson title.
You’ll see that, again, theΒ editor interfaceΒ as just as you’re used to using with a regular WordPress page or post:
Here, you can add the lesson content similar to how you would create a standard blog post. You can add and format your text. Also, if you want toΒ add images or videos, you can click on theΒ Add MediaΒ button at the top of the editor.
At the bottom of the page, there will be a section forΒ Lesson Settings:
Unless you want to specify a duration for this particular lesson, you can leave the value at 0. Also, you can leave theΒ Preview LessonΒ option disabled. However, if you want to allow students toΒ preview this lessonΒ to get an idea of what your course would consist of it, you can enable it. Of course, you only would want to do this for one or two lessons, rather than your entire course.
You can also choose to enable or disable comments on the course. When you’re done, click on theΒ UpdateΒ button.
Step 5: Create Quizzes
Aside from lessons, the other type of content you canΒ include in your course is quizzes. To do this, navigate toΒ LearnPress > Quizzes > New Quiz:
Name your quiz, then use the text box to add a description or instructions for your quiz. Then you can beginΒ adding your quiz questionsΒ under theΒ QuestionsΒ section:
After you type your question, you can click on theΒ Add as NewΒ button toΒ select a question format, including
- True or false
- Mutli Choice
- Single Choice
Once you select an option, you can choose content to display for the question explanation.Β Under theΒ General SettingsΒ section, you can furtherΒ customize the quiz.
For example, you can choose whether to show the correct answer once a student chooses one as well asΒ determine what’s considered a passing grade:
You can also choose whether or not you want toΒ display hints to the questions. Once you’re done creating the quiz, selectΒ PublishΒ in the top right-hand corner.
Step 6: Link the Lessons and Quizzes to the Course
So far, you’ve created the foundation for your online course, including the description, lessons, and quizzes. However, in order to tie everything together, you need toΒ link the lessons and quizzesΒ that you haven’t yet to the course. Otherwise, they’re just saved in your LearnPress LMS, but unassigned to any specific course.
For example, in the previous step, we created a course quiz, which we want toΒ add at the end of the course. To do this, you can navigate back to the online course page (LearnPress > Courses).
Under theΒ CurriculumΒ section, select either the clock icon to create a new quiz or theΒ Select itemsΒ buttonΒ to choose one you already created:
A window will open with two tabs:Β LessonΒ andΒ Quiz. Click onΒ Quiz, thenΒ select the quizΒ you just created, followed by theΒ AddΒ button:
Repeat this processΒ for any additional quizzes or lessons you want to add to your course.
Step 7: Preview and Publish Your Online Course
Once you’re done adding lessons and quizzes to your course,Β you can preview itΒ by clicking on theΒ Save DraftΒ button, followed byΒ PreviewΒ in the top right-hand corner of the screen:
If you’re happy with how it looks, theΒ only thing left to do is publish it. Navigate back to the course page, then select theΒ PublishΒ button.
Congratulations! You just learned how to create an online course for free using WordPress.
Tips for Promoting Your Online Course π’
Once you have your first online course created, the next step is toΒ begin promoting it. This part is particularly important if you are selling your course and using it to generate a side income.
There are many different ways to promote your online course. Some of the mostΒ popular and effective methodsΒ include:
- Create a unique landing page. Aside from the course page, it’s also a smart idea to create a unique landing page for your online course that you can link to in your promotions. This can help minimize distractions and let you better understand where leads are coming from. Feel free to review ourΒ guide on WordPress landing pages.
- Share it on social media.Β Post a link to your online course on your social media channels. Use relevant hashtags that pertain to the topic.
- Focus on your unique value proposition (UVP). What makes your course different than others out there? If there’s anything specific or unique that sets your online course apart from your competitors, be sure to highlight that in your promotions.
- Share the online course with your email list. If you have an email newsletter, don’t forget to incorporate your online course into the messages. If you don’t have a newsletter but want to start building out your subscriber list, check out our post on the bestΒ lead capture pluginsΒ to use.
You might also considerΒ offering a discountΒ to your social media followers. Alternatively, you can offer a limited-time sale to new visitors or subscribers to your site.
For example, if you’re using the LearnPress plugin, you canΒ add a ‘sale’ price to your online course. To do this, navigate toΒ LearnPress > Courses. Select your course, then click on theΒ PricingΒ tab under theΒ Course Settings section:
After you enter the sale price, you can also choose a start and end date for the promotion. Be sure to update your changes.
Offering a discount on your online course can mean an uptick in enrollment. Additionally, it can also increase subscribers and followers, which can be effective for lead generation.
Frequently Asked Questions About Creating Online CoursesβοΈ
So far, we’ve covered what an online course is, the different types of online classes you can create, as well as how to create an online course with WordPress. However, there are still some frequently asked questions (FAQs) about creating online courses we want to address:
Creating a WordPress online course is incredibly easy when you use one of the many LMS plugins available. As you might recall, most LMS plugins are premium add-ons. Therefore, if you're looking for aΒ free LMS plugin, we suggest using LearnPress.
However, if you don't mind shelling out a little bit of cash for aΒ premium LMS plugin, you also have a handful of quality ones to choose from. A popular choice isΒ LearnDash:
LearnDash is aΒ robust, easy to use pluginΒ that lets you create course content, including quizzes, certificates, and more. With this add-on, you can sell your online course as a one-time purchase, membership, or subscription. There areΒ three pricing options, starting at $199 for one site.
Just because you learned how to create an online course for free doesn't mean you should give it away for free.Β After all, one of the biggest reasons to create an online course is to increase your revenue.Β Deciding how much to charge, though, can be a bit trickier.
If you're unsure where to start, we recommend doing some market research and seeing what your competitors areΒ charging for similar online courses. You can also check out our podcast to gain someΒ advice from pricing experts.Β Remember that you can always adjust the price as needed, increasing or decreasing the amount based on audience response.
Technically, you do not need to use a WordPress LMS theme for your online course. If you use an LMS plugin on your WordPress site, you can simply create a landing page for the courseΒ using your existing theme.
However, if you're creating a new website dedicated to your online courses,Β using a WordPress LMSΒ theme can be helpful. Many come with built-in features and designs that hep enhance the e-learning experience. For example,Β Education LMSΒ is a popular and free WordPress theme.
Also, some LMS plugins, including LearnPress, come with LMS themes you canΒ purchase as an add-on. With LearnPress, they are available underΒ LearnPress > Add-ons > Themes.
Wrapping Up π
Whether you want to establish yourself as an expert in your industry or are looking for ways to generate a new revenue stream for your business, creating and selling online courses can help. After you create your content, though, how do you turn it into a course that people can access from your WordPress site?
In this post, we discussed how to create an online course for free with WordPress in seven simple steps:
- Download a LMS plugin such as LearnPress.
- Add a new course.
- Configure the course settings.
- Add your lessons to the curriculum.
- Create a quiz.
- Link the lessons and quizzes to the course.
- Preview and publish your online course.
Once you create your online courses, it’s important to make sure that the WordPress site you host them on is properly maintained and updated. We can help with that. At WP Buffs, we offer Care Plans that make managing your site simple and straightforward, so you can focus more time on best serving your students!
Want to give your feedback or join the conversation? Add your comments π¦ on Twitter!
Image credit: Unsplash.