Chaosamran_Studio / stock.adobe.com
If you’ve used WordPress for any amount of time, you’re likely no stranger to the power of plugins. However, using plugins on your website and creating your own are two very different things. If you’re interested in WordPress plugin development, you might be confused about where to even begin.

Fortunately, it’s easier to build your own plugins than you might expect. Gaining a solid understanding of how plugins work and how they’re created is the first key step. Once you have the core concepts nailed down, creating and installing your own simple plugins is fairly easy.
In this post, we’ll explain the basics of WordPress plugin development, including the necessary elements and how they work together. We’ll also walk you through our six-step WordPress plugin development tutorial, and provide some tips and best practices for creating your first plugin. Let’s get started!
In This Article 👁
- An Introduction to WordPress Plugin Development
- How WordPress Plugins Work
- A 6-Step WordPress Plugin Development Tutorial
- WordPress Plugin Development Best Practices
- Frequently Asked Questions About WordPress Plugin Development
- Wrapping Up
Here at WP Buffs, we help website owners, agency partners, and freelancer partners monitor their WordPress sites 24/7. Whether you’re new to WordPress or looking to dip your toes into development and design, we’re here to support your needs.
An Introduction to WordPress Plugin Development ✍️
WordPress plugins offer a powerful way to enhance the functionality of your website. You can extend your site’s features beyond what’s available in the core WordPress platform, without directly editing any code.
With thousands of plugins available in the WordPress Plugin Directory, why develop your own? Creating your own plugins lets you add customized functionality to your website, which may not be available in any existing plugins.
[bctt tweet=”🔨 Creating your own plugin is one of the best ways to add unique functionality to your site. #WordPress” username=”thewpbuffs”]
Additionally, plugin development is relatively easy to learn and offers greater flexibility and cost efficiency than hiring a developer to make custom additions to your site. Plus, it’s a great way to deeply learn how the back end of WordPress works.
At a basic level, a plugin consists of one or more functions and files written in PHP, the primary scripting language of WordPress. It also contains four essential elements, which we’ll discuss in detail in the next section: actions, filters, shortcodes, and widgets.
You don’t need to be an experienced programmer to develop your own WordPress plugins. However, this task will be significantly easier if you have basic knowledge and familiarity with PHP, CSS, and HTML. Fortunately, there are many tutorials online that can help you brush up on those core languages.
How WordPress Plugins Work 🗃
In order to develop your own plugin, it’s critical to first understand how the key systems work. Plugins operate primarily using hooks, which are a way for one piece of code to interact with (‘hook into’) another. WordPress has two types of hooks: actions and filters. We’ll discuss these in more detail below, along with two other elements that are commonly used in plugin development.
Actions
A WordPress action refers to a specific activity that is going to happen at a particular time. With actions, you can add or change the functionality of your plugin. The functions that are attached to an action will be executed once that action is triggered.
An example of a WordPress action is save_post. Actions are defined by the do_action function. They require the $tag parameter (the name of the action), and in some cases $args (additional arguments expanding what the action does).
WordPress core comes with dozens of predefined actions. However, you can also create your own. Either way, when developing your WordPress plugin, you’ll use do_action to set values for your hooked function. The add_action function will then be used to connect that function to a specific action.
Filters
WordPress filters are hooks that accept a single variable or a series of variables and then send them back after they’ve been modified. In a nutshell, filters let you change the content that is displayed to users.
WordPress filters are created using the apply_filters function and are defined inside of that function. They require the $tag (the filter name) and $value (the filtered value or variable) arguments, with the option of using $var for extra function values.
You can create your own filter by using the apply_filters hook. Then to execute it, you can use the add_filter function. This will let you hook a specific function to the filter, so you can manipulate the variable and return it.
Shortcodes
Put simply, shortcodes are user-facing bits of code that give users a quick and easy way to create and display custom functionality to their sites’ visitors. Shortcodes can be placed in posts and pages via the editor, in menus and widgets, and so on.
Many plugins make use of shortcodes. You can create your own shortcode by using the add_shortcode function. The name of your shortcode will be the first variable, and the second variable will be the output function. The output function consists of three values: attributes, content, and name.
Widgets
Another way to enable plugin functionality through a simple interface is by using WordPress widgets. You can create a widget by extending the WP_Widget class. WordPress uses an object-oriented design approach to widgets, meaning that the functions and values are stored in a single entity of a class.
Before you begin your WordPress plugin development, we recommend reading up on these topics to further understand how plugins work. Here are some helpful WordPress plugin development tools and resources you can use:
A 6-Step WordPress Plugin Development Tutorial 🔌
Now that we’ve looked at the elements that make up a plugin, it’s time to talk about how you can create one. It’s important to note that, before adding a new plugin to your website or editing any files, you’ll first want to set up a testing environment or staging site. This lets you experiment safely, without the risk of breaking your live site.
[bctt tweet=”🧪 Always test changes to your website – including new plugins – on a staging site first. #WordPress” username=”thewpbuffs”]
With that out of the way, let’s take a look at the six steps in our WordPress plugin development tutorial:
- Choose a Plugin Name
- Create Your Plugin Folder and PHP File
- Add Your File Header
- Program Your Plugin and Add Functions
- Compress Your Plugin Folder
- Activate the Plugin on Your WordPress Site
Step 1: Choose a Plugin Name
The first step in WordPress plugin development is to come up with an official name for your plugin. You’ll want to choose one that is relevant to what the plugin does but is also unique.
It’s a good idea to check the WordPress Plugin Directory and perform a few Google searches, to make sure there are no other plugins out there that already have the name you’re thinking about using. Keep in mind that your official plugin name will be what you use for the plugin’s folder and PHP file as well.
You may also end up using an abbreviated version of the plugin’s name as a prefix, in order to avoid naming collisions (which we’ll discuss later on). Therefore, you’ll also want to choose a name that can be easily abbreviated to create a unique identifier.
Step 2: Create Your Plugin Folder and PHP File
First and foremost, your plugin needs somewhere to live. Therefore, after you decide on a name for your plugin, the next step is to create a folder for it.
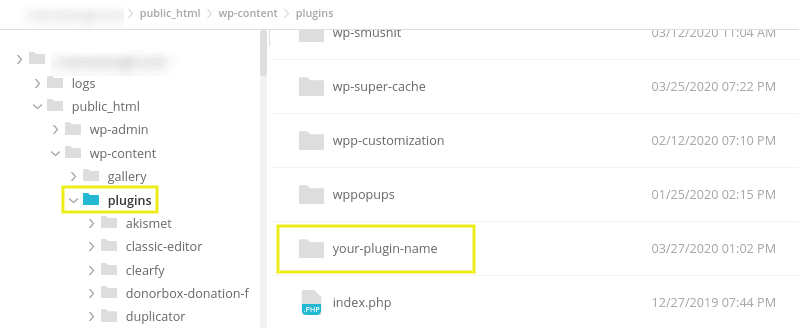
To get started, head to the wp-content/plugins folder of your WordPress installation. Create a new folder and name it using the plugin’s name, using hyphens to separate words (i.e., “your-plugin-name”):
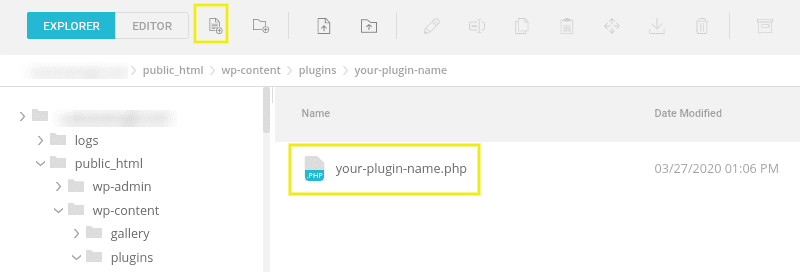
Once you have your plugin folder set up, the next step is to create a PHP file inside of it. You’ll want to use the same naming convention (for example, “your-plugin-name.php”):
Depending on how complex your plugin will be, it may end up containing a single PHP file or multiple files. For example, you might have separate files for language, CSS, etc.
Step 3: Add Your File Header
Once you create your main plugin file, it’s time to add the file header. Essentially, this is a PHP block comment that includes metadata about your plugin.
Inside the file, add the following code:
/**
* Plugin Name: Your Plugin Name
* Plugin URI: http://yourdomain.com
* Description: Insert a brief description of what your plugin does here.
* Version: 1.0.0
* Author: Your Name
* Author URI: http://yourdomain.com
* License: GPL2
*/
Of course, you’ll want to replace the information above with the details that pertain to your plugin. Also, if your plugin directory has multiple PHP files, make sure you only add this header to one of them.
At a minimum, this header must contain your plugin’s name. However, you can also use this space to include details about the author, license, etc.
When you’re done, save your changes. Your plugin should now be added to your WordPress site. To make sure that’s the case, navigate to your WordPress admin dashboard and go to Plugins:
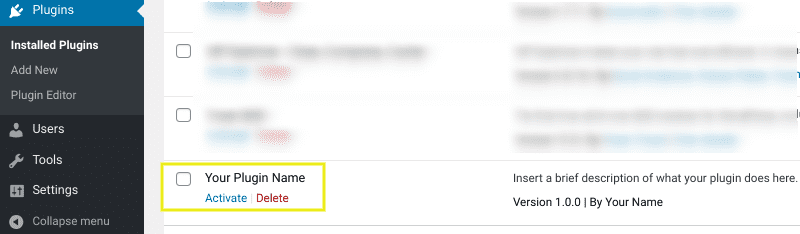
You should see your new plugin listed on this screen. Of course, there’s still more work to do.
Step 4: Program Your Plugin to Add Functions
At this point, you’ve set up the basic framework for your plugin. However, it obviously doesn’t do anything yet. For that, you’ll need to program your plugin using the elements we discussed earlier in this post.
There are a ton of ways you can create and use plugins – too much to cover in one post. However, if you need help writing the code for your plugin, we suggest using the WordPress Codex as a guide.
Keep in mind that you may want to create different files for your plugin. For example, you might set up individual files for CSS, JavaScript, images, and so on. While this isn’t a requirement, it can be incredibly helpful for organizational purposes, especially if your plugin does more than one thing. If you do end up with multiple files, you’ll be adding them to a compressed folder before uploading them to your site.
Step 5: Compress Your Plugin Folder
As we saw earlier, once you add a PHP file to your WordPress plugins directory, the plugin will automatically be added to your WordPress site. However, when you’re writing your PHP file and plugin code, you might also be using a text or code editor. This can be one of the most useful WordPress plugin development tools in your arsenal.
Before you upload your plugin to your WordPress site, you’ll need to convert it to the .zip format. Therefore, once you’re done adding all the code you want to include, you can go ahead and compress the plugin folder. To do that, you can usually just right-click on the folder and select Compress.
Step 6: Activate and Run the Plugin on Your WordPress Site
Once you’re done creating the first draft of your plugin, you can finally get to the fun part: using it on your WordPress site! If you haven’t added it to your WordPress installation yet, you can upload the folder via your plugins directory (see Step 2 above for more details).
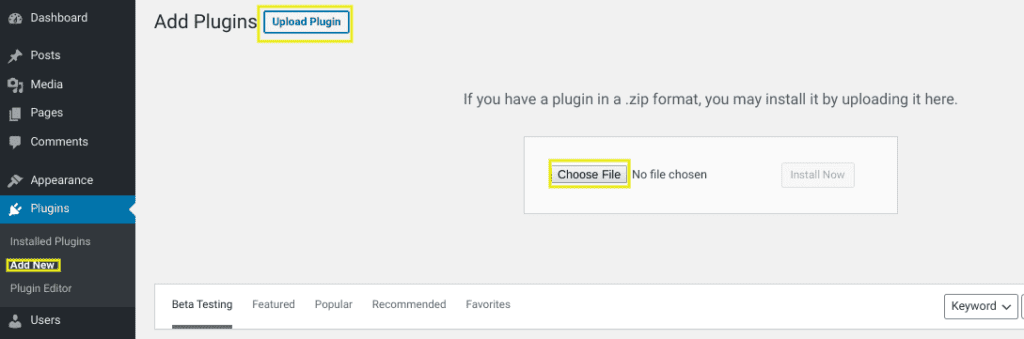
If the plugin is in a .zip folder on your computer, you can add it in your WordPress dashboard by navigating to Plugins > Add New > Upload Plugin > Choose File:
If the plugin was already in your WordPress directory, simply navigate to the Plugins screen and click on the Activate link. Then you’re ready to start testing out your plugin and making changes and improvements as needed.
WordPress Plugin Development Best Practices 🔑
Before, during, and after WordPress plugin development, there are a handful of best practices you’ll want to keep in mind. These tips can help to ensure a smooth development process and aid in your plugin’s effectiveness.
For example, when you’re first creating your plugin, be specific and strategic about the name you choose. You’ll want to make sure it’s unique, so you don’t run into confusion or conflict with other plugins. You can also check out WordPress’ recommendations on naming your plugin.
[convertkit form=2644196]
We also recommend keeping a clean WordPress plugin structure. Ideally, the your–plugin-name.php file will be at the root of your plugin’s directory, with everything else organized into sub-folders. To keep your folder structure clean and simple, WordPress suggests using the following hierarchy:
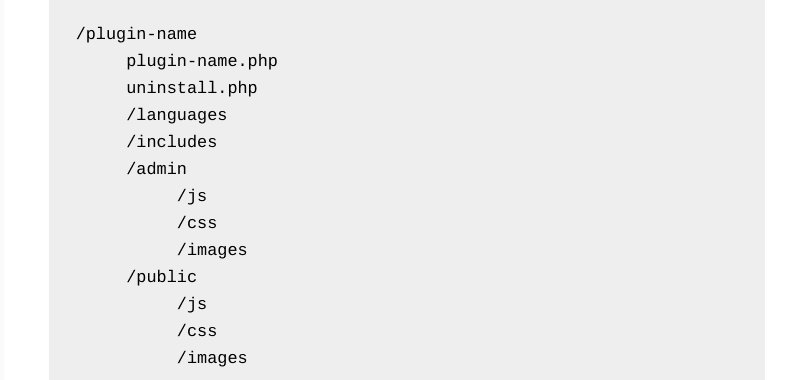
Another helpful tip involves prefixing. When prefixing your functions, avoid using the wp_ prefix. By default, WordPress code functions use this prefix, so using it for your plugin can cause compatibility issues. Instead, you’ll want to use something that is unique to your plugin, such as an abbreviated version of the name.
If this is your first time working with plugins or creating one from scratch, you might also consider using a WordPress plugin boilerplate to start from. This will give you a foundation for your WordPress plugin development. It offers a clear guide that will aid you during the building process.
Finally, remember to make plugin security a priority. The last thing you want is for your plugin to make your WordPress site susceptible to intruders. For more information about plugin security, you can refer to the Plugin Handbook.
Frequently Asked Questions About WordPress Plugin Development 🙋🏻♂️
At this point, you’ve hopefully gained a basic understanding of WordPress plugin development, and have an idea of what the process will look like. However, you might also still have questions. With that in mind, let’s take a look at some FAQs about WordPress plugin development:
How Do I Get My Plugin into the WordPress Plugin Directory?
It’s perfectly fine to create a plugin for your website and use only. However, many developers also want to have their plugin included and even featured in the WordPress Plugin Directory.
To do that, you need to submit your plugin to the WordPress Plugin Team. They have specific criteria and requirements your plugin must meet in order to be submitted, let alone accepted. Therefore, the best way to get your plugin into the directory is to carefully review their guidelines and suggestions.
Do I Need to License My WordPress Plugin?
If you’re planning to only use your plugin for private purposes, there’s no need to license it. However, if you plan to share it with the public, or submit it to the WordPress Plugin Directory, you’ll need to license it. Per WordPress guidelines, all plugins must adhere to the GNU General Public License v2 or later.
What If I Want to Uninstall My Plugin?
You can uninstall your plugin just as you would any other WordPress plugin. For example, you can deactivate it from the WordPress dashboard, and then delete it from your site.
However, there are also two additional methods you can use. The first is to use the register_uninstall_hook function. The second is to create an uninstall.php file, and then add it to the root folder of your plugin’s directory (/your-plugin-name/uninstall.php).
How Many Files Should My Plugin Have?
As you might recall, your plugin can have a single PHP file or multiple files within its folder. The WordPress plugin structure is really up to you and will vary depending on how simple or complex you want your plugin to be.
If you do have a complex plugin, splitting up its code into different files and folders will generally be the safer, smarter route. This makes navigating your plugin’s code easier, so you can quickly find and make changes when necessary.
In the WordPress Plugin Development Best Practices section, we discussed some tips for structuring your plugin folder system. Feel free to refer to that as a guide for creating your plugin’s file and folder hierarchy.
Can I Write Plugin Functions in the Theme functions.php File?
If you’ve worked with or developed WordPress themes before, you probably know that a theme uses a functions.php file. However, the difference between plugins and themes is that plugins are standalone modules. They do not affect the WordPress core code.
While it’s possible to add plugin-like functions to your theme’s functions.php file, we strongly advise against this. When you update or change themes, you can lose that code. This can also make finding and debugging issues more complicated.
The nice thing about plugins is that they are standalone entities, and aren’t tied to your site’s theme. Therefore, you won’t have to worry about their functionality becoming inactive if you switch themes.
Wrapping Up 👏🏻
Plugins are a powerful way to expand the functionality of your WordPress site. Getting into WordPress plugin development positions you to add custom features to your site, without having to rely on other developers.
In this post, we’ve looked at how you can develop a WordPress plugin in just six steps:
- Name your plugin, making sure it’s both specific and unique.
- Create a plugin folder and PHP file in your WordPress directory.
- Add your plugin file header.
- Program your plugin by adding functions.
- Compress your plugin folder into a .zip file.
- Activate the plugin on your WordPress site.
At WP Buffs, we offer multiple levels of Care Plans that can help secure your WordPress site, including premium maintenance services and plugin updates and configuration. If you need help or want to save time, we’ve got you covered!
Want to give your feedback or join the conversation? Add your comments 🐦 on Twitter!
Image credit: Unsplash.