WDnet Studio / stock.adobe.com
In today’s fast-paced, ever-evolving world of online marketing, the processes and tools you use play an integral role in your site’s performance. Google Analytics and similar tools help you assess site performance and strengthen your online presence. However, to get the most out of these tools, you need tags.

Google Tag Manager (GTM) offers the advantage of quickly adding and updating tags on your site with ease and efficiency. You can use it to deploy tags on your site and mobile apps to better understand conversions and site analytics.
In this post, we’ll explain what Google Tag Manager is and the benefits of using it. Then we’ll walk you through how to set up Google Tag Manager in WordPress in six simple steps. Let’s get started!
In This Article 👀
- What Are Site Tags and How Do They Work?
- What Is Google Tag Manager?
- What Are the Benefits of Using Google Tag Manager for WordPress?
- Your Options for Setting Up Google Tag Manager on WordPress
- How to Set Up Google Tag Manager in WordPress (In 6 Steps)
- How to Set Up Google Tag Manager in WordPress Without a Plugin
- Wrapping Up
What Are Site Tags and How Do They Work? 🏷️
Before we get into Google Tag Manager itself, it’s important to first understand what site ‘tags’ are. Put simply, tags are snippets or pieces of code that are embedded into your site to collect certain data.
Aside from code, site tags can also be used in other forms. For example, they can be shown as transparent pixels as well as image tags. However, in any form, the function of the tag is the same.
In a nutshell, tags are tools you can use to gather information from your website. This data could be about a particular site visitor or about on-site behavior patterns over time.
Some of the most common types of analytical data you might use these tags for is the traffic of your WordPress site as well as conversions. Additionally, these tags can collect information such as:
- Visitor duration
- Form submissions
- Traffic sources
- Links clicked
Every tag on your site tracks something different. Their purpose is to allow for third-party tracking. However, they can also be used for reporting, optimization, and even for functions such as live on-site chats.
Like most site owners, there’s probably a wide range of metrics you want to track on your WordPress site. So it’s crucial to have an efficient method of doing so. However, there are many other reasons why you’d want to take a strategic approach to creating, organizing, and managing your site tags.
Too many tags can slow your site down. Also, inefficiencies can disrupt your data collection and lead to inaccurate reports. Therefore, correct tag governance is important, and for this, you need a proper tag management solution. That’s where Google Tag Manager comes in.
What Is Google Tag Manager? 🖥️
Manually coding tags can be time-consuming and tedious. This is especially true if you don’t have any development or coding experience. Fortunately, you can utilize site tags without having a background in web development.
Google Tag Manager lets you manage website tags without the need to edit your code. Put simply, GTM is a free tag management solution you can use to add and update your site tags to better understand its conversions and analytics. It’s also useful because it ensures all your tags are working correctly.

You can add a code snippet to your site pages one time. Then, GTM makes it easy to add and update subsequent site tags as needed. You can add an unlimited number of tags to your site. However, you can easily track and manage them all from one single dashboard.
Some helpful GTM features include:
- Asynchronous tag loading
- Define reusable variables
- Mobile app and AMP support
- Tag pausing, blacklisting, and sequencing
It comes with an easy-to-use interface, preview mode, and multi-user support. Finally, GTM lets you control when and how tags fire and automatically generates the correct tracking code.
What Are the Benefits of Using Google Tag Manager for WordPress? 🔑
There are many benefits of using Google Tag Manager for your WordPress site. Overall, it makes it easier to track activity across your site, which can make it easier to achieve your specific marketing goals.
Google Tag Manager is built to work seamlessly with a variety of Google products and services you already use, such as Google Analytics and AdSense. However, in addition to these Google tools, you can also integrate Tag Manager with third-party analytics and tracking platforms.
[bctt tweet=”🏷️Google Tag Manager makes it easier to track activity across your WordPress site. #WordPress” username=”thewpbuffs”]
The Tag Manager makes it easier to exercise greater control over your marketing tags. It includes speedy tag-loading features to ensure data is reliable and accurate.
Additionally, it lets you create better collaboration across your organization and make quicker, more informed decisions. It also frees up your IT department to focus on bigger-picture tasks.
Thanks to its automated and error-checking process, it minimizes the risk of human error that would be present if you were to add and update tags manually. Finally, using Google Tag Manager for WordPress eliminates the need to individually and manually code each marketing tag you want to use on your site.
Your Options for Setting Up Google Tag Manager on WordPress ⚒️
Before you learn how to set it up, it helps to first understand how Google Tag Manager for WordPress works. In short, there’s a container snippet that contains a small piece of JavaScript and nonJS code.
You can copy and paste this code into your web pages, with no need to edit it further. You simply use the GTM interface to add and update your Google Ads, Analytics, and non-Google tags.
There are two main methods you can use to set up Google Tag Manager: the manual method and a plugin. In each method, the stages are largely the same, however with the latter, you’ll use a plugin to add the code to your site rather than editing your site files yourself.
Using the plugin method is quick, simple, and often the better choice if you don’t have any coding experience. However, if you want to avoid installing another plugin on your WordPress site, you can set up Google Tag Manager without one.
However, it’s important to note that there’s no straightforward, one-size-fits-all approach to setting it up by editing your theme files. Each theme is different. So while the directions may be similar, there might be additional steps depending on the theme you’re using.
Regardless of the method you use, we recommend having your Google Analytics account set up before starting.
How to Set Up Google Tag Manager in WordPress (In 6 Steps) 🔌
Now you understand what Google Tag Manager is and the benefits of using it, it’s time to get it set up for your WordPress site! Let’s take a look at how you can do so in six simple steps:
- Create Your Google Tag Manager Account
- Install and Activate the Header, Footer, and Post Injections Plugin
- Add Code Snippets to Your WordPress Site
- Create Your First Tag
- Publish Your Container
- Verify That the Code Snippets Are Working
The following steps are based on the method where you use a plugin. It’s beginner-friendly. However, if you wish to use the method without a plugin, we also walk you through this process later in the post.
Step 1: Create Your Google Tag Manager Account
The first thing you’ll need to do before using the Google Tag Manager for your WordPress site is, of course, create a GTM account. You can do this for free via the GTM website.
Once there, click on the blue Start for Free button in the top-right corner. You will be redirected to the Tag Manager admin page.
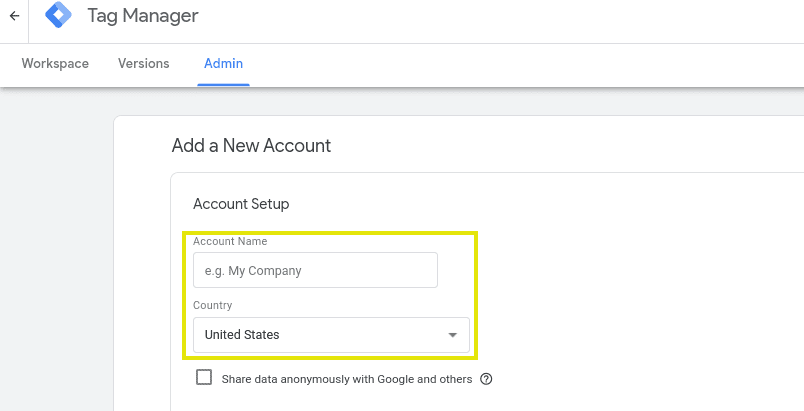
In the first section, choose your Account Name (typically the name of your business) and location:
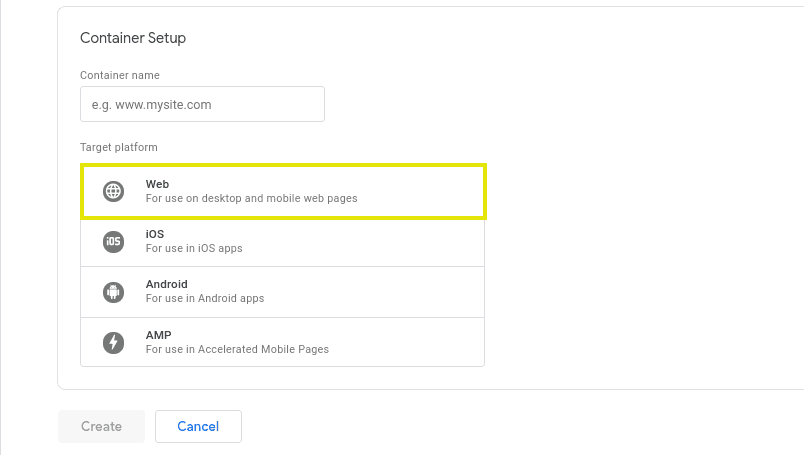
In the second section, choose a Container Name (you can use your domain name.) For the Target platform, you’ll have four options. For this, we’ll choose Web:
When you’re done, click on the Create button at the bottom of the page. You’ll have to click on Yes on the Terms of Service Agreement before proceeding.
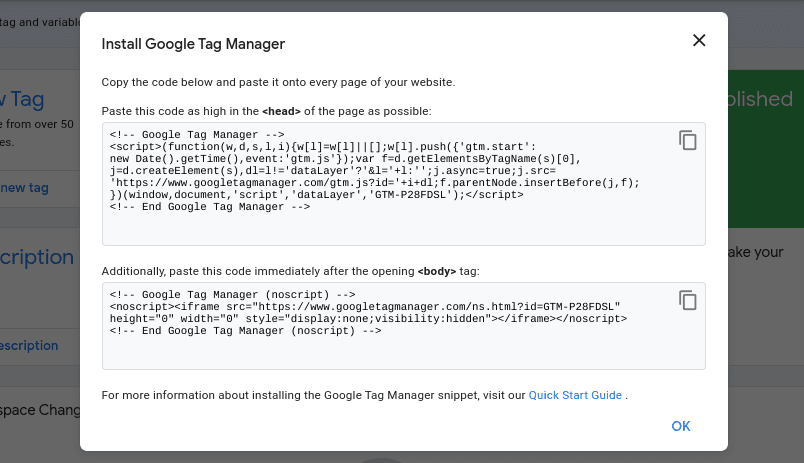
Once you do, the Tag Manager code snippets will appear:
For this demonstration, we’ll be using a plugin to add the code to your site. So you can exit out of this window for now. Don’t worry, you’ll be able to come back to it!
Step 2: Install and Activate the Header, Footer, and Post Injections Plugin
Now, it’s time to switch over to the back end of your WordPress site. From your WordPress admin dashboard, the next step is to install and activate the Header, Footer, and Post Injections plugin:

This plugin makes it easy to take the code snippets from the Google Tag Manager and add it to your WordPress site. It’s free and easy to use. You can find it by going to Plugins > Add New, then searching in the search bar for it.
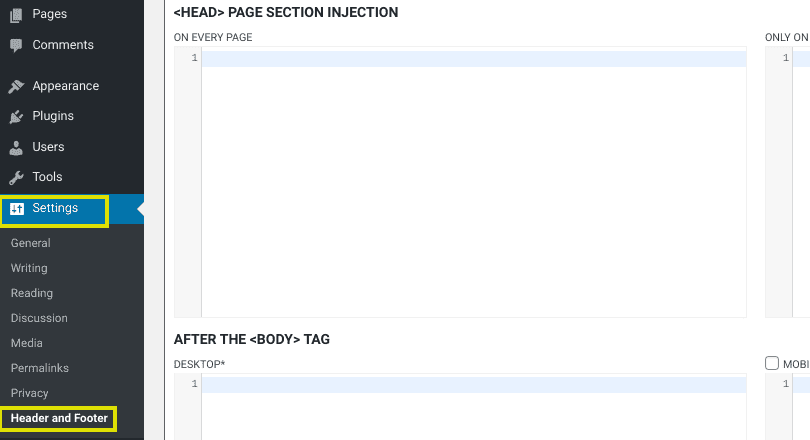
Click on the Install Now button, followed by the Activate button. Once it’s activated, you will be able to locate it from your dashboard by going to Settings > Header and Footer:
Again, you can add the code snippets without using a plugin. So if you want to do it the manual method, you can skip to the next section.
Step 3: Add Code Snippets to Your WordPress Site
Now that you have your Google Tag Manager account set up and the Header and Footer plugin, it’s time to connect the two. The purpose of the plugin is to make it easier to add the code snippets of your Tag Manager to your WordPress site without editing your files.
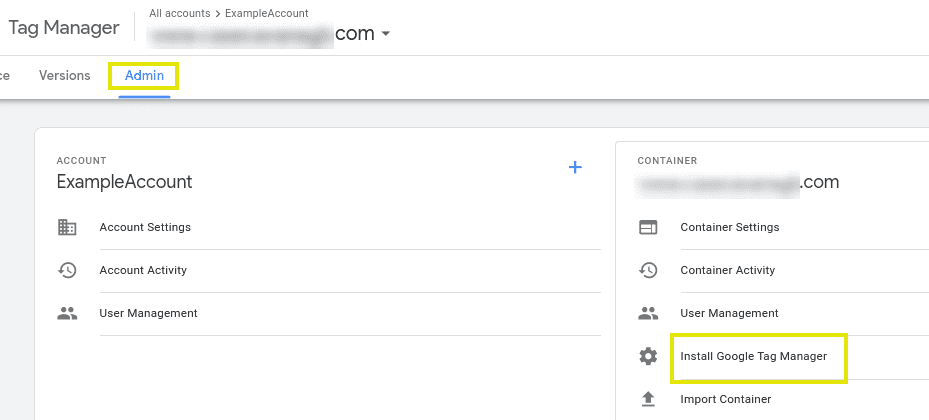
Navigate back to your Google Tag Manager account. Click on the Admin menu tab, followed by Install Google Tag Manager:
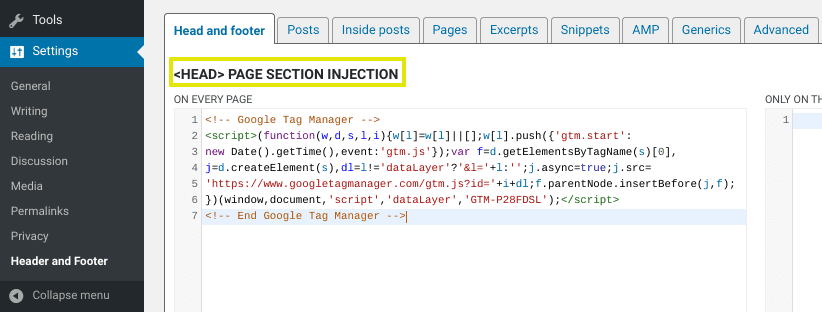
On the next page, you’ll see the same code snippets that appeared in the pop-up window after setting up your account in Step 1. Copy the code from the <head> section, then navigate back to your WordPress admin dashboard.
Next, go to Settings > Header and Footer. Under the Head and footer tab, paste the code in the <HEAD> PAGE SECTION INJECTION box:
Then, repeat the same process for the AFTER THE <BODY> TAG section:
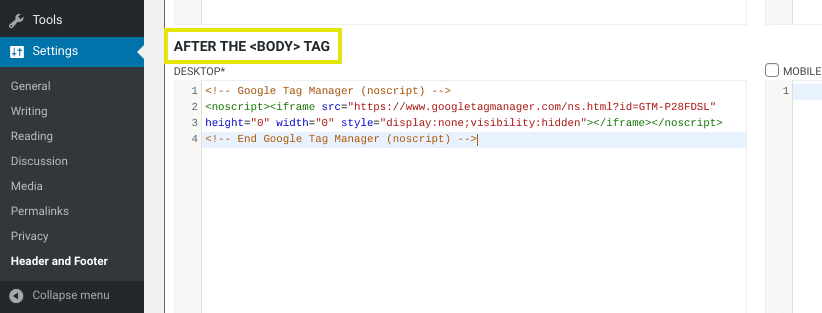
When you’re done, click on the Save button at the bottom of the page.
Step 4: Create Your First Tag
At this point, you should have the plugin successfully installed and configured to your Google Tag Manager account. Now, it’s time to get to the fun stuff: creating site tags!
When you’re ready to create your first tag, navigate back to your Google Tag Manager account. Under the Workspace menu tab, click on Add a new tag:

There will be two sections:
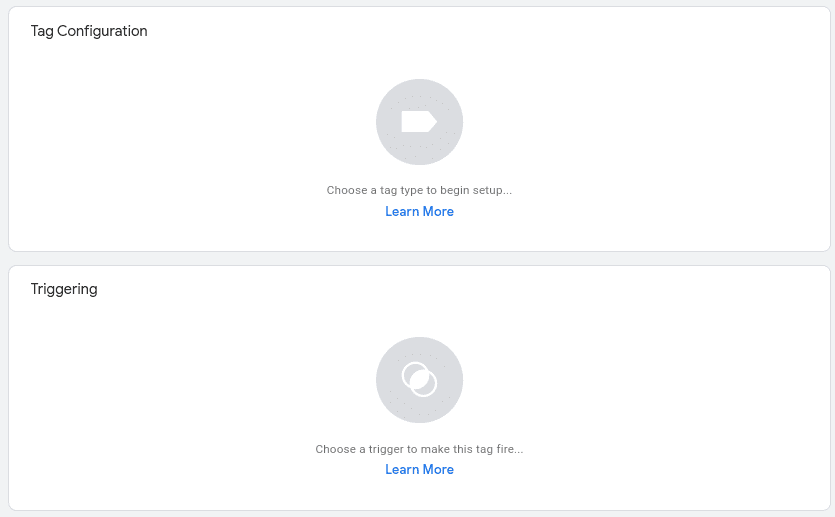
The first is for Tag Configuration. This is where you can choose from a list of different tag types. For this demonstration, we’ll use Google Analytics:

As an aside, we suggest having your Google Analytics account set up ahead of time. Once you select Google Analytics, you can choose a specific Track Type from the drop-down menu.
Here, we’ll choose the default Page View. Other options include Event, Transaction, Social, Timing, and more.
The next step is to either configure a Google Analytics variable or connect it to your Google Analytics Tracking ID. To enable the latter, check the box next to Enable override settings in this tag:
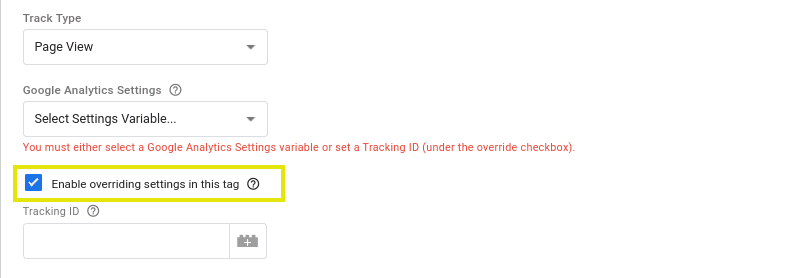
In the Tracking ID box, enter your Google Analytics Tracking ID. You can locate this by going to Admin > Tracking Info > Tracking Code within Google Analytics:
![]()
Now, we move on to the Triggering section. This is where we choose a trigger, which will be used to determine when the tag is recorded:
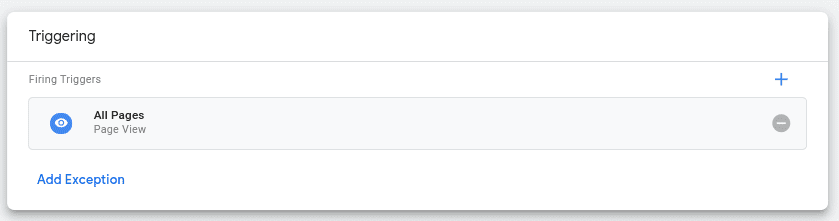
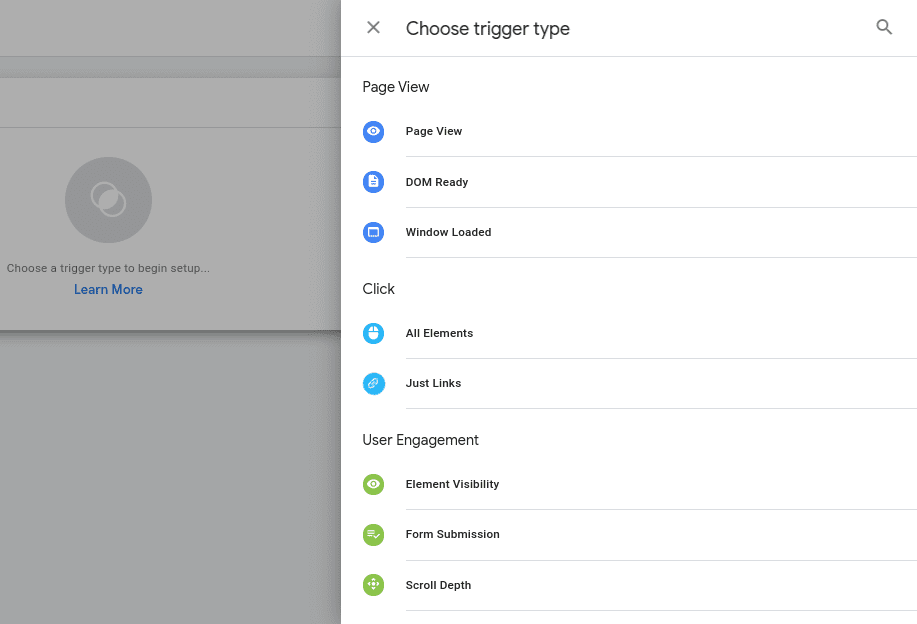
For example, if you want the tag to trigger every time someone visits the page, you would select All Pages. There is also a list of trigger types you can choose from:
When you’re finished, click on the blue Save button in the top-right corner of the screen.
Step 5: Publish Your Container
In order for your tags to go live, you need to submit them. To activate the tag, you can click on the Submit button from the Google Tag Manager dashboard.
Once you do this, you’ll be brought to the Submission Configuration page:
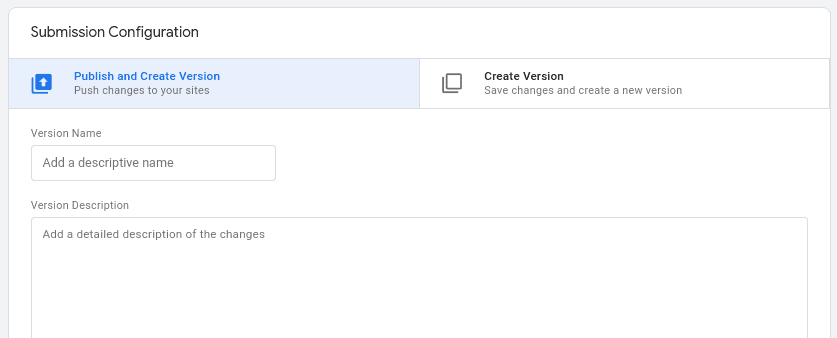
You’ll notice two options:
- Publish and Create Version
- Create Version
If you’re ready for the tag to go live on all the pages of your WordPress site, you can select the first option to Publish and Create Version. Once you select that option, click on the Publish button in the top-right corner.
After you click on the Publish button, a pop-up window for Container Version Description will appear:
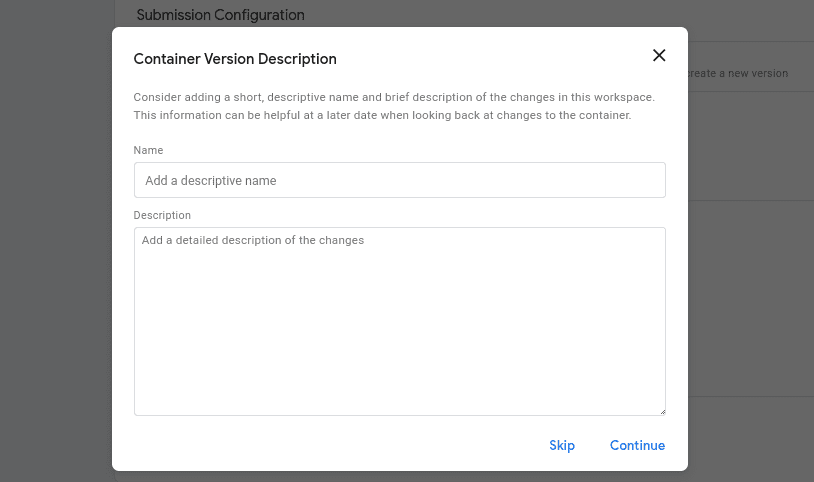
While it’s optional (you can press the Skip button at the bottom), we suggest filling it out. This is where you can input information about this container that will help keep your tags organized.
In this case, we would name the container Page Views. When you’re done, click on the Continue in the bottom-right corner. It will then bring you to the Versions Summary page.
Step 6: Verify That the Code Snippets Are Working
So, at this point, you should have set up your Google Tag Manager account and connected it to WordPress. Hopefully, you’ve also created and published your first tag.
However, to make sure everything is configured correctly, it’s important to verify that the code snippets are working. There are a couple of methods you can use to go about this.
The first is to use the GA Checker tool:
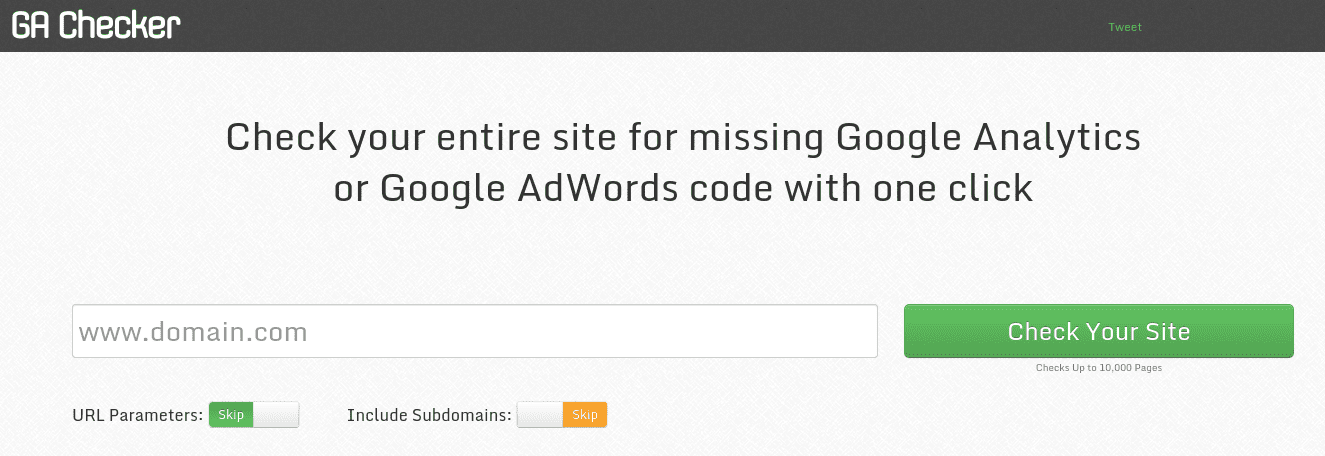
With this free tool, you can simply enter your domain name and click on the Check Your Site button. The results will notify you if you have any missing Google Analytics or Google AdWords code.
Another tool we recommend using to verify whether your Google Tag Manager is working correctly is Google Tag Assistant:

This is a Chrome extension. From the Chrome web store, you can click on the Add to Chrome button, it will add an icon to your browser.
To check for tags, open your domain in a new browser tab, and enable the icon from the browser. It will tell you how many tags are found (if any) and which individual tags within a container are firing.
How to Set Up Google Tag Manager in WordPress Without a Plugin🧱
As we mentioned earlier, there is a way to set up Google Tag Manager in WordPress without a plugin. The initial steps will largely be the same as they were for the previous section, so much of the repeat steps will be shortened in this section. However, if you need more detailed instructions, feel free to use the previous section as a reference.
Step 1: Set Up Your Google Analytics and Google Tag Manager accounts
First, we recommend setting up a Google Analytics account if you do not already have one. If you do already have an Analytics account, have your Tracking ID on hand.
While it’s not 100 percent necessary to have an Analytics account set up before installing Google Tag Manager, you’ll need at least one Google product to create a new tag and make sure it’s working. For the purpose of this demonstration, we use Google Analytics, since most site owners have this set up already.
Next, you’ll want to set up a new Google Tag Manager account. Once you’re done with the initial account setup, a pop-up window will appear with header and body code snippets. (You can refer to Step 1 for details.)
Step 2: Add Code Snippets to Your WordPress Site
The code in the Google Tag Manager account pop-up window is important; it is what you’ll need to add to your WordPress site in order to deploy the Tag Manager. However, first, there’s another code snippet we need to add to the site.
To do this without using a plugin, navigate to your WordPress admin dashboard, and go to Appearance > Theme Editor. Next, in your child theme’s function.php file, insert the following code:
add_action('wp_head', 'gtm_head_code');
Function gtm_head_code(){
?>
FIRST_SCRIPT_FROM_GTM_INTERFACE
<?php
}
add_action('wp_footer', 'gtm_body_code');
Function gtm_body_code(){
?>
SECOND_SCRIPT_FROM_GTM_INTERFACE
<?php
}
Of course, replace FIRST_SCRIPT_FROM_GTM_INTERFACE and SECOND_SCRIPT_FROM_GTM_INTERFACE with the <header> and <body> code, respectively. These are the code snippets that appear in the pop-up window after you’ve made your account.
If you exit out of the window, you can access the code at any time. Just go to your Google Tag Manager dashboard, then Admin > Install Google Tag Manager. Make sure to save the changes to your theme’s function.php file.
Step 3: Test to Make Sure It’s Working Correctly
Once you complete the above steps, you’ll want to verify that you’ve implemented and deployed the Google Tag Manager code correctly. To do this, you can refer to Step 6 from the previous section.
Just to quickly summarize, there are a couple of third-party tools you can use. We suggest using the GA Checker or Google Tag Assistant. Both are free and easy to use for confirming that your Google Tag Manager on WordPress is correctly set up.
Wrapping Up 💭
Tags are an essential part of tracking and understanding your site’s activity. However, manually adding and updating each tag is both tedious and inefficient. The more practical solution is to use Google Tag Manager.
In this post, we’ve explained how you can set up Google Tag Manager in WordPress using one of two methods: manually adding code to your theme’s files or through a plugin. With either method, after you create your GTM account, you can:
- Add code snippets to your WordPress site.
- Create your first tag.
- Publish your container.
- Verify that code snippets are working.
Do you have any questions about using or setting up Google Tag Manager for WordPress? Let us know in the comments section below!
Image credit: Brett Jordan.